本来想一周内完成,看来要延期了,尽量希望能在这几天内完成吧,31号晚上还有qax的一面😭😭,水平果然还是太次了。

项目地址:google/AFL(github.com)

前言

AFL,全称“American Fuzzy Lop”,是由安全研究员Michal Zalewski开发的一款基于覆盖引导(Coverage-guided)的模糊测试工具,它通过记录输入样本的代码覆盖率(代码执行路径的覆盖情况),以此进行反馈,对输入样本进行调整以提高覆盖率,从而提升发现漏洞的可能性。AFL可以针对有源码和无源码的程序进行模糊测试,其设计思想和实现方案在模糊测试领域具有十分重要的意义。

各模块简要说明

源码模块图像一览,图源来自文章:AFL二三事 - FreeBuf,侵删

1632794006_615275964fc6378475599

插桩模块

  • afl-as.h, afl-as.c, afl-gcc.c:普通插桩模式,针对源码插桩,编译器可以使用gcc, clang;
  • llvm_mode:llvm 插桩模式,针对源码插桩,编译器使用clang;
  • qemu_mode:qemu 插桩模式,针对二进制文件插桩。

fuzzer 模块

  • afl-fuzz.c:fuzzer 实现的核心代码,AFL 的主体。

其他辅助模块

  • afl-analyze:对测试用例进行分析,通过分析给定的用例,确定是否可以发现用例中有意义的字段;
  • afl-plot:生成测试任务的状态图;
  • afl-tmin:对测试用例进行最小化;
  • afl-cmin:对语料库进行精简操作;
  • afl-showmap:对单个测试用例进行执行路径跟踪;
  • afl-whatsup:各并行例程fuzzing结果统计;
  • afl-gotcpu:查看当前CPU状态。

部分头文件说明

  • alloc-inl.h:定义带检测功能的内存分配和释放操作;
  • config.h:定义配置信息;
  • debug.h:与提示信息相关的宏定义;
  • hash.h:哈希函数的实现定义;
  • types.h:部分类型及宏的定义。

普通插桩

afl-gcc.c

afl-gcc.c本质上是对GCC 和 clang的封装,正如其在注释中写到的wrapper for GCC and clang。最常见的使用方式,便是在使用**./configure**时,直接将afl-gcc或着afl-clang的路径传给CC;同理对于C++代码,只需用afl-g++或者afl-clang++路径传给CXX即可。

几个静态全局变量:

1
2
3
4
5
static u8*  as_path;                /* Path to the AFL 'as' wrapper      */
static u8** cc_params; /* Parameters passed to the real CC */
static u32 cc_par_cnt = 1; /* Param count, including argv0 */
static u8 be_quiet, /* Quiet mode */
clang_mode; /* Invoked as afl-clang*? */

main

main函数的核心主体如下

1
2
3
4
5
6
7
8
9
10
11
12
int main(int argc, char** argv) {
......

find_as(argv[0]);

edit_params(argc, argv);

execvp(cc_params[0], (char**)cc_params);

......
return 0;
}
  • find_as: try to find our “fake” GNU assembler in AFL_PATH or at the location derived from argv[0]. If that fails, abort.
  • edit_params: Copy argv to cc_params, making the necessary edits.
  • execvp: 执行命令

edit_params

edit_params中,关键逻辑如下

1
2
3
4
5
6
7
8
9
10
11
12
13
14
15
16
17
18
19
...

if (!strcmp(name, "afl-g++")) {
u8* alt_cxx = getenv("AFL_CXX");
cc_params[0] = alt_cxx ? alt_cxx : (u8*)"g++";
} else if (!strcmp(name, "afl-gcj")) {
u8* alt_cc = getenv("AFL_GCJ");
cc_params[0] = alt_cc ? alt_cc : (u8*)"gcj";
} else {
u8* alt_cc = getenv("AFL_CC");
cc_params[0] = alt_cc ? alt_cc : (u8*)"gcc";
}

...

cc_params[cc_par_cnt++] = "-B";
cc_params[cc_par_cnt++] = as_path;

...

总体逻辑比较简单,实际就是对参数做一些预处理,会用gcc替换cc_params[0],利用-B as_path替换汇编器。因而在调用execvp执行命令时,本质上就是执行类似gcc ... -B as_path ...这样的效果。

afl-as.c

在理解afl-gcc.c之后,我们就自然而然会想到,核心点在于关注afl-as和默认as的区别。类似于afl-gcc,afl-as也是一个对as的封装

一些全局静态变量:

1
2
3
4
5
6
7
8
9
10
11
12
13
static u8** as_params;          /* Parameters passed to the real 'as'   */

static u8* input_file; /* Originally specified input file */
static u8* modified_file; /* Instrumented file for the real 'as' */

static u8 be_quiet, /* Quiet mode (no stderr output) */
clang_mode, /* Running in clang mode? */
pass_thru, /* Just pass data through? */
just_version, /* Just show version? */
sanitizer; /* Using ASAN / MSAN */

static u32 inst_ratio = 100, /* Instrumentation probability (%) */
as_par_cnt = 1; /* Number of params to 'as' */

main

main()函数的核心主体如下,与afl-gcc.c中的main十分类似。比较明显,都是通过先对参数进行处理,然后调用execvp()去执行命令。

1
2
3
4
5
6
7
8
9
10
11
12
13
14
15
16
17
18
19
20
21
22
int main(int argc, char** argv) {
...
gettimeofday(&tv, &tz);

rand_seed = tv.tv_sec ^ tv.tv_usec ^ getpid();

srandom(rand_seed);

edit_params(argc, argv);
...

if (!just_version) add_instrumentation();

if (!(pid = fork())) {

execvp(as_params[0], (char**)as_params);
FATAL("Oops, failed to execute '%s' - check your PATH", as_params[0]);

}
...

}
  • 第一部分,比较明显,利用时间和pid即生成随机数
  • edit_params()编辑参数
  • add_instrumentation()插桩
  • 最后利用execvp调用指令

edit_params

与afl-gcc的逻辑基本一致,替换参数,不过多赘述,核心部分如下:

1
2
3
4
5
6
7
8
9
10
 static void edit_params(int argc, char** argv) {
...

as_params[0] = afl_as ? afl_as : (u8*)"as";
...

as_params[as_par_cnt++] = modified_file;

as_params[as_par_cnt] = NULL;
}

add_instrumentation

比较明显的看到其他部分与afl-gcc基本相同,因而我们关键来看看add_instrumentation()函数这部分内容。这个函数主要用于处理输入的文件,然后生成modified_file.并在恰当的地方插桩。此函数的核心部分如下:

1
2
3
4
5
6
7
8
9
10
11
12
13
14
15
16
17
18
19
20
static void add_instrumentation(void) {
...
/*
匹配合适的插桩位置
*/
...
while (fgets(line, MAX_LINE, inf)) {
...

fprintf(outf, use_64bit ? trampoline_fmt_64 : trampoline_fmt_32,
R(MAP_SIZE));

ins_lines++;

...

continue;
}
...
}

从源代码的注释中我们也能看到,AFL插桩的位置偏好,主要为函数入口,分支标签,条件分支标签…….

1
2
3
4
5
6
7
8
9
10
11
12
13
14
15
16
17
18
19
20
21
22
23
/* If we're in the right mood for instrumenting, check for function
names or conditional labels. This is a bit messy, but in essence,
we want to catch:

^main: - function entry point (always instrumented)
^.L0: - GCC branch label
^.LBB0_0: - clang branch label (but only in clang mode)
^\tjnz foo - conditional branches

...but not:

^# BB#0: - clang comments
^ # BB#0: - ditto
^.Ltmp0: - clang non-branch labels
^.LC0 - GCC non-branch labels
^.LBB0_0: - ditto (when in GCC mode)
^\tjmp foo - non-conditional jumps

Additionally, clang and GCC on MacOS X follow a different convention
with no leading dots on labels, hence the weird maze of #ifdefs
later on.

*/

add_instrumentation()函数中的变量trampoline_fmt_64trampoline_fmt_32即为插桩代码,我们可以在文件afl-as.h中找到定义,这里我们直接看看64位的插桩代码

1
2
3
4
5
6
7
8
9
10
11
12
13
14
15
16
/* --- AFL TRAMPOLINE (64-BIT) --- */

.align 4

leaq -(128+24)(%%rsp), %%rsp
movq %%rdx, 0(%%rsp)
movq %%rcx, 8(%%rsp)
movq %%rax, 16(%%rsp)
movq $0x%08x, %%rcx
call __afl_maybe_log
movq 16(%%rsp), %%rax
movq 8(%%rsp), %%rcx
movq 0(%%rsp), %%rdx
leaq (128+24)(%%rsp), %%rsp

/* --- END --- */

流程非常简单易懂,大致如下:

  1. 入栈保存寄存器
  2. call __afl_maybe_log
  3. 出栈恢复寄存器

这里直接来看看__afl_maybe_log函数,由于这段汇编逻辑过长,大概200多行。这里直接放ScUpax0s师傅的流程图
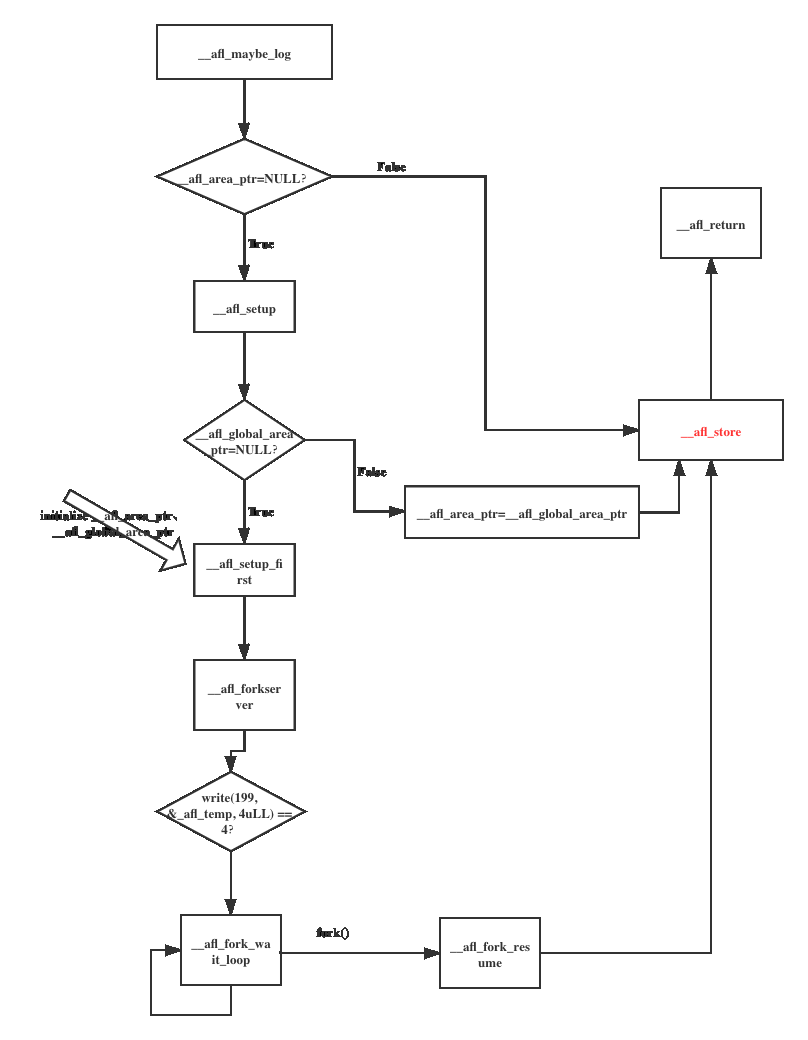
image-20230830151452876

流程图中涉及到的一些变量及含义如下:

1
2
3
4
5
6
.lcomm   __afl_area_ptr, 8			/*共享内存地址*/
.lcomm __afl_prev_loc, 8 /*上一个插桩位置(id为R(100)随机数的值)*/
.lcomm __afl_fork_pid, 4 /*由fork产生的子进程的pid*/
.lcomm __afl_temp, 4 /*缓冲区*/
.lcomm __afl_setup_failure, 1 /*标志位,如果置位则直接退出*/
.comm __afl_global_area_ptr, 8, 8 /*全局指针*/