上个一个part主要关注的是插桩相关部分的源码,这一节主要来查看afl-fuzz.c这个核心模块的源码部分
概述
由于该部分代码体量过大,我们只对核心部分进行源码解析。这部分总体可以分为三块:
- 初始配置:进行fuzz环境配置相关工作
- fuzz执行:fuzz的主循环过程
- 变异策略:测试用例的变异过程和方式
预处理
首先从main()函数着手进行分析。在完成初始配置后,main()同样利用time生成随机种子
1 | gettimeofday(&tv, &tz); |
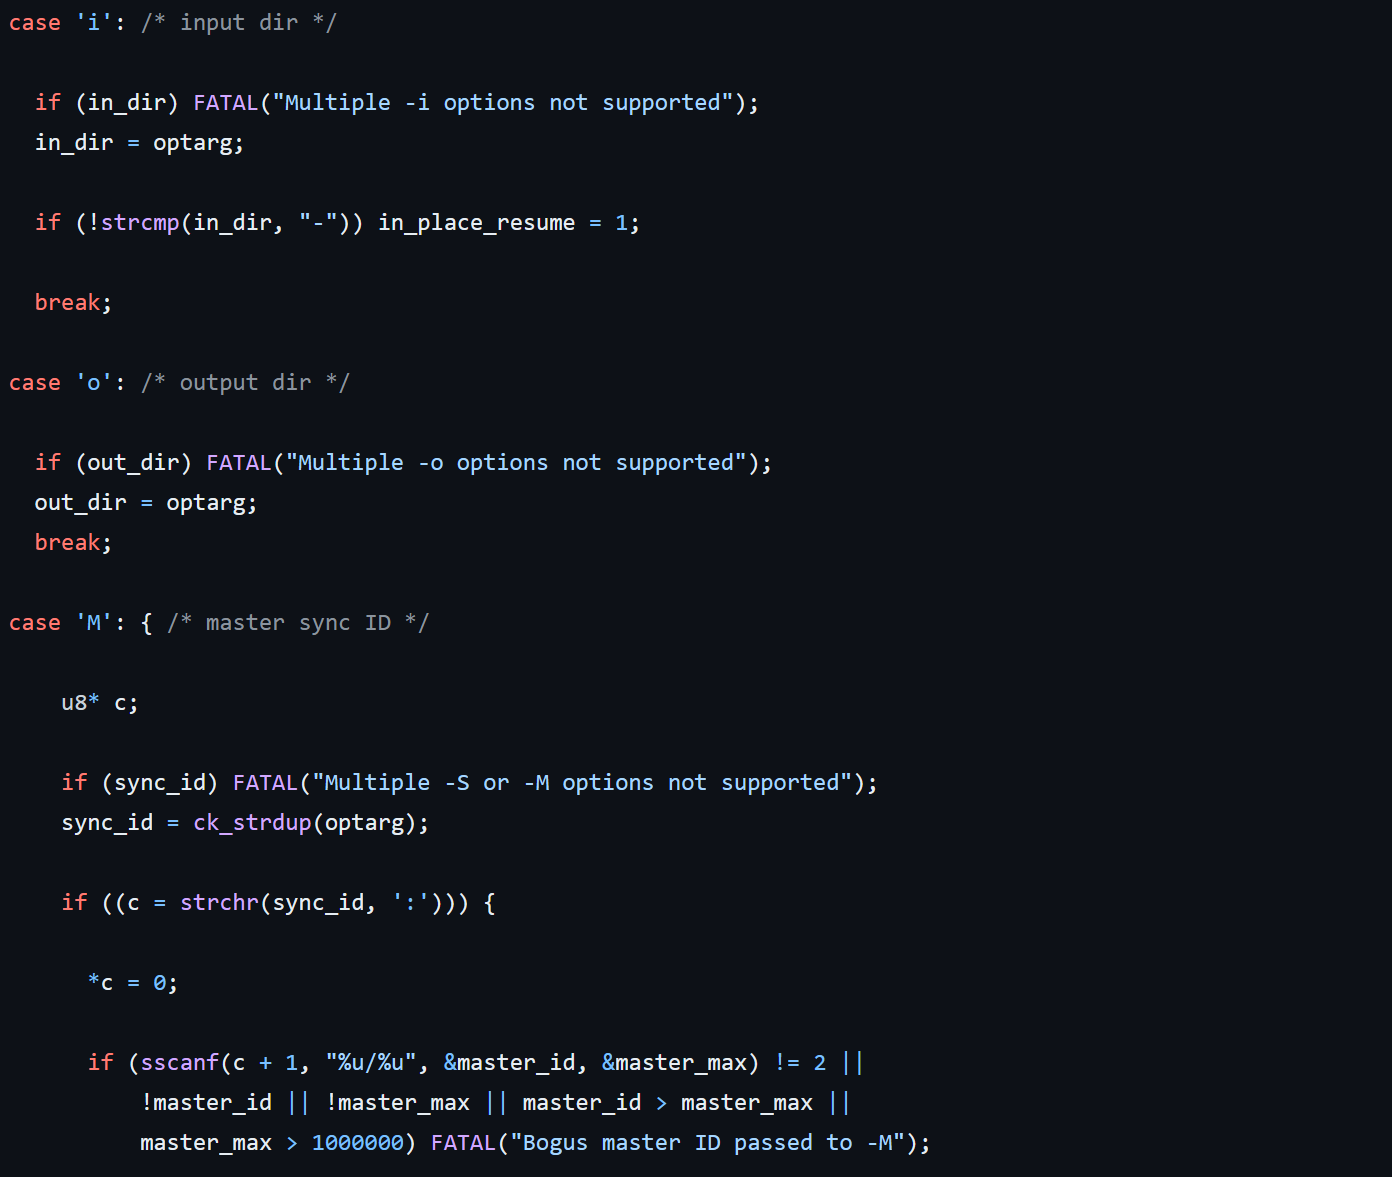
紧接着便是第一个循环
1 | while ((opt = getopt(argc, argv, "+i:o:f:m:b:t:T:dnCB:S:M:x:QV")) > 0) |
这个循环的功能还是比较明显的。从下图的部分源代码和注释中,我们可以看出,其主要是获取命令行传入的参数,以及一些对应flag的设置。
紧接着便是setup_signal_handlers()函数,主要是调用sigaction(),注册一些信号处理函数,具体内容如下:
| 信号 | 作用 |
|---|---|
| SIGHUP/SIGINT/SIGTERM | 处理各种“stop”情况 |
| SIGALRM | 处理超时的情况 |
| SIGWINCH | 处理窗口大小 |
| SIGUSER1 | 用户自定义信号,这里定义为skip request |
| SIGSTP/SIGPIPE | 其他一些不重要信号 |
然后接着仍是一些参数处理的函数check_asan_opts(),用来读取环境变量ASAN_OPTIONS和MSAN_OPTIONS;fix_up_sync()用来处理-M,-S相关参数;check_if_tty用于检查程序是否使用tty终端运行;最后还有get_core_count, check_crash_handing, check_cpu_governor这些函数用来做CPU检查相关。
setup_shm
紧接着便是初始化shm和virgin_bits相关内容的重要函数setup_shm(),这些变量用于记录tuple相关状态,源码如下:
关于tuple的定义可以查看我在AFL白皮书中有关Detecting new behaviors的内容:【fuzz】AFL白皮书中英双语版 - 鷺雨のBlog (loora1n.github.io)
1 | static void setup_shm(void) { |
这里主要有四个核心变量,定义如下:
1 | EXP_ST u8* trace_bits; /* SHM with instrumentation bitmap */ |
从注释我们可以看到,trace_bits指向存放插桩情况位图的共享内存,virgin_bits[MAP_SIZE]主要是用于记录未到达区域,而virgin_tmout和virgin_crash则是记录timeout和crash的情况。
文件及模式选择
然后仍是一些处理函数,我用注释标识函数用途
1 | ... |
perform_dry_run
接下来调用perform_dry_run(use_argv),这是一个十分核心的函数,函数注释: Perform dry run of all test cases to confirm that the app is working as expected. This is done only for the initial inputs, and only once. 大致含义为:试运行所有初始的测试用例以确保应用可以正确运行,且仅执行一次。
1 | struct queue_entry* q = queue; |
函数开头首先对输入队列进行遍历,queue相关变量含义如下:
1 | static struct queue_entry *queue, /* Fuzzing queue (linked list) */ |
在while(q)部分中,首先根据路径,打开输入文件并传入变量use_mem,接着调用函数进行检测
1 | while(q){ |
接下来我们关注一下calibrate_case函数的流程:
- 初始化设置,user_tmout、stage_name、stage_max
- 判断 forkserver 状态,若未启动,则调用
init_forkserver()初始化 - 进入循环,对用例进行测试,循环为一下步骤
- 调用
write_to_testcase(),将输入写入测试文件 - 调用
runtarget(),fuzz目标程序并监控 - 检测是否出现crash或新路径,并更新位图,记录测试相关状态
- 当存在新tuple,调用
update_bitmap_score(),来确定”more favorable path” - 若不存在,则反馈给父进程
- 调用
简化后的函数源码如下:
1 | static u8 calibrate_case(char** argv, struct queue_entry* q, u8* use_mem, |
基本到这里该函数就结束了,剩下的部分都是一些错误信息处理相关内容
fuzzer与forkserver通信
在这里我们停顿一下,梳理下fuzzer与forkserver通信的大致流程。首先我们要知道,实际用于fuzz的子进程并不有fuzzer fork得到,而是由fuzzer 启动的forkserver进行fork得到,如图所示

两者之间通信我们可以由下图观之
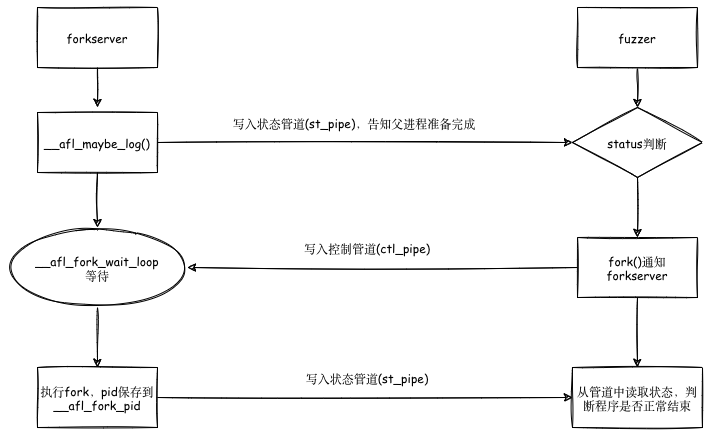
其中
__afl_maybe_log()在源码分析part1中可以看到,其实就是插桩代码的核心函数
首先,afl-fuzz会创建两个管道:状态管道和控制管道,然后执行目标程序。此时的目标程序的main()函数已经被插桩,程序控制流进入__afl_maybe_log中。如果fuzz是第一次执行,则此时的程序就成了fork server们之后的目标程序都由该fork server通过fork生成子进程来运行。fuzz进行过程中,fork server会一直执行fork操作,并将子进程的结束状态通过状态管道传递给afl-fuzz。
cull_queue
回到主函数,接下来即将进入主循环。再次之前会调用cull_queue()函数,对队列进行精简。主要是通过遍历top_rated[]条目,然后标记favored条目
这里的处理流程可以举个例子理解,现假设有如下tuple和seed信息:
- tuple: t0, t1, t2, t3, t4
- seed: s0, s1, s2
- 初始化
temp_v = [1,1,1,1,1] - s1可覆盖t2, t3,s2覆盖t0, t1, t4,并且top_rated[0] = s2,top_rated[2]=s1
将按照如下过程进行筛选和判断:
- 首先判断 temp_v[0]=1,说明t0没有被覆盖;
- top_rated[0] 存在 (s2) -> 判断s2可以覆盖的范围 ->
trace_mini = [1,1,0,0,1]; - 更新
temp_v=[0,0,1,1,0], 标记s2为 “favored”; - 继续判断 temp_v[1]=0,说明t1此时已经被覆盖,跳过;
- 继续判断 temp_v[2]=1,说明t2没有被覆盖;
- top_rated[2] 存在 (s1) -> 判断s1可以覆盖的范围 ->
trace_mini=[0,0,1,1,0]; - 更新
temp_v=[0,0,0,0,0],标记s1为 “favored”; - 此时所有tuple都被覆盖,具备”favored’标记的为s1, s2,过程结束。
主循环
接下来便要进入主循环,简化版代码如下
1 | while (1) { |
可以看到主要流程便是cull_queue()–>fuzz_one(),不断循环往复。由于fuzz_one的代码量过长,这里只做功能和流程分析:
- 根据是否有
pending_favored和queue_cur的情况,按照概率进行跳过;有pending_favored, 对于已经fuzz过的或者non-favored的有99%的概率跳过;无pending_favored,95%跳过fuzzed&non-favored,75%跳过not fuzzed&non-favored,不跳过favored; - 假如当前项有校准错误,并且校准错误次数小于3次,那么就用calibrate_case进行测试;
- 如果测试用例没有修剪过,那么调用函数trim_case对测试用例进行修剪;
- 修剪完毕之后,使用calculate_score对每个测试用例进行打分;
- 如果该queue已经完成deterministic阶段,则直接跳到havoc阶段;
- deterministic阶段变异4个stage,变异过程中会多次调用函数common_fuzz_stuff函数,保存interesting 的种子:
- bitflip,按位翻转,1变为0,0变为1
- arithmetic,整数加/减算术运算
- interest,把一些特殊内容替换到原文件中
- dictionary,把自动生成或用户提供的token替换/插入到原文件中
- havoc,中文意思是“大破坏”,此阶段会对原文件进行大量变异。
- splice,中文意思是“绞接”,此阶段会将两个文件拼接起来得到一个新的文件。
- 该轮完成。
总结
基本AFL流程由两篇文章叙述,由于时间问题,不能将每个文件与函数分析透彻。比如像样本变异策略这样的核心内容并无介绍,但也希望对大家的AFL学习理解有所帮助。
文章如有纰漏,请在评论区指出,我会及时修改。